Write That Pattern! How To Write A Crochet Pattern
/I was recently asked by Vincent of Knot Bad to help him learn to write patterns for his wearable items. That request for help was followed by a long series of texts over the next several days with lessons covering everything from how to determine gauge and yarn requirements to general verbiage and then... like magic he published his first wearable pattern. YAY! Success!

I was also helping two other friends begin writing patterns this week and since I know so many ask about writing patterns and bringing ideas to life, I thought why not share my process with everyone and make it a blog post. Now I am sitting here typing and thinking, I wish I had saved my texts with Vincent so I could paste them here for ease. LOL. No worries... we can dive in. Let me start by saying: YOU CAN DO THIS.
To begin, I always go back to something Drew Emborsky (AKA The Crochet Dude) told me when I was first starting to write my own patterns and overwhelmed and clueless: Start simple. Make it a tutorial and just tell people what to do. It is so simple it is almost mind blowing. Write down what you do. Revolutionary right? But that's all a pattern really is: instructions to tell someone else how to achieve the same result you did. A roadmap.
My first patterns were more like tutorials and not at all technical. But they got the job done: to tell people how to make what I made. As my designs grew in difficulty, my pattern writing skills were becoming more developed as well. So while tutorials saying do this, then do this are great and can often do the trick, for garments with sizing and items with design variations I would need to go beyond that with solid pattern writing.
It all starts with an idea and some yarn...
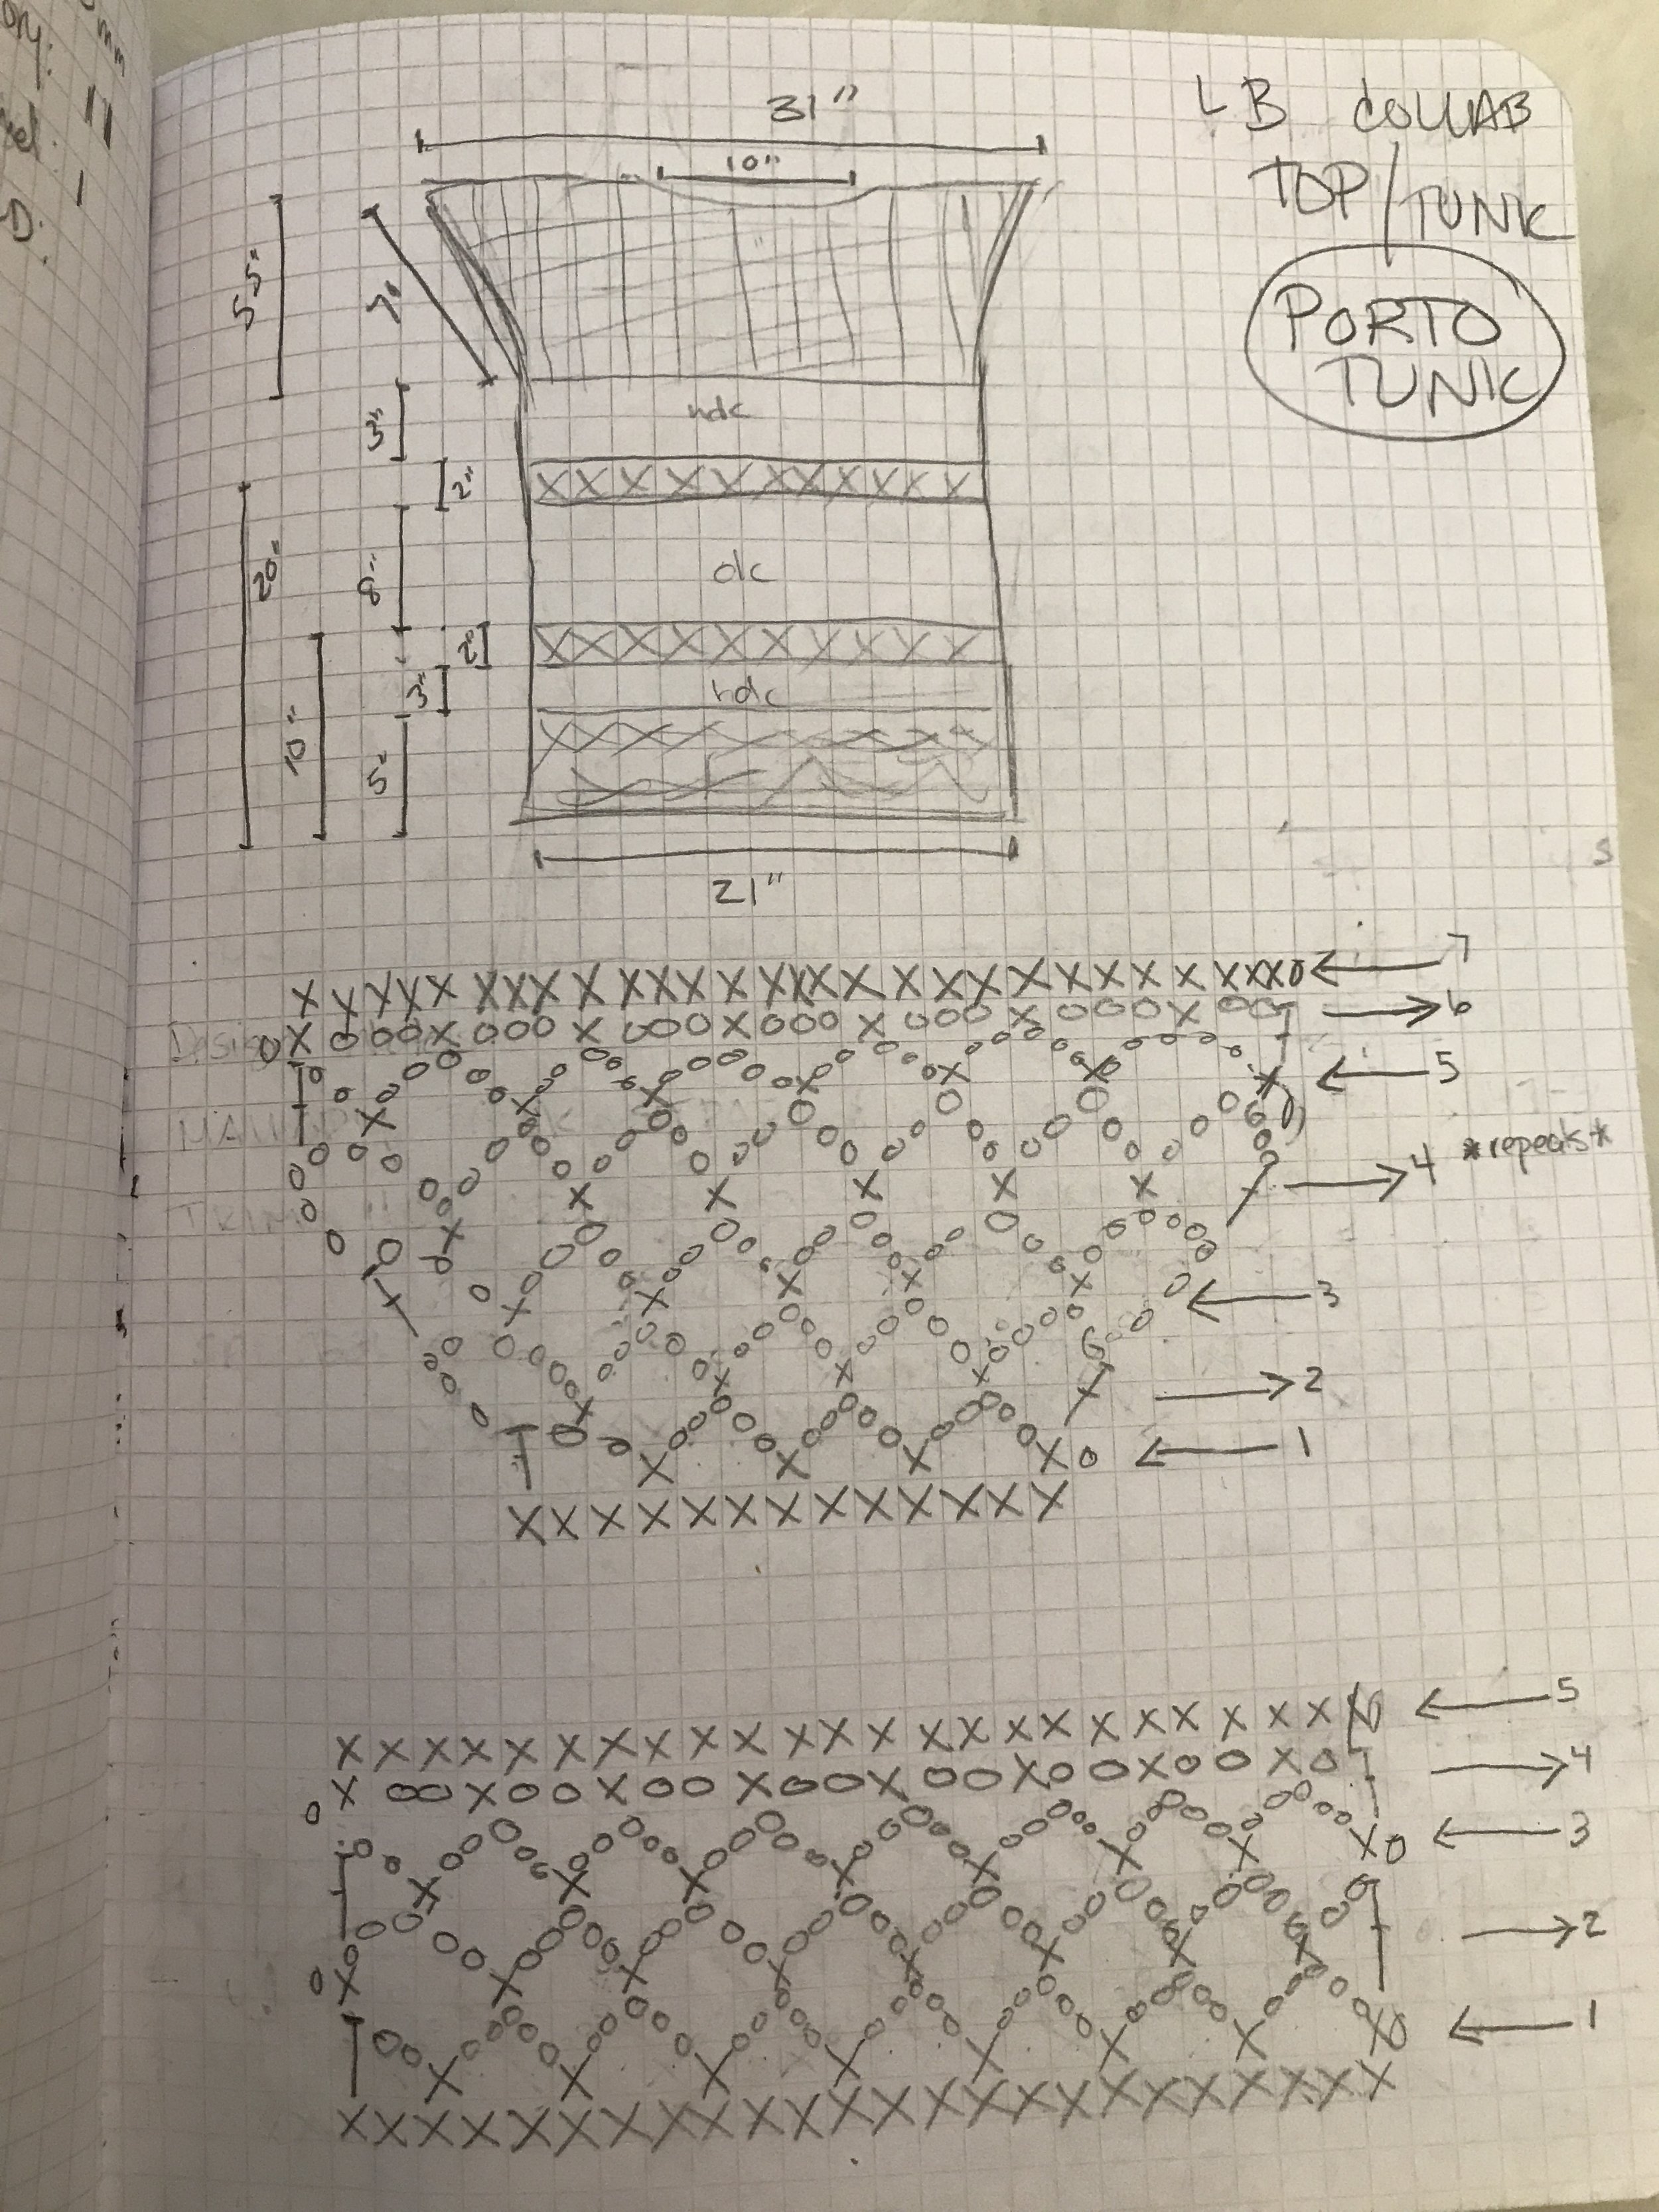
For me, my process always starts with an idea. I have in my mind a look to achieve. As I work to achieve that look I take detailed notes. I have learned over the years that I should use pencil. There is a lot of erasing in my process. I also have a single design book that is in my studio but also carry mini design books in my bag for ideas that hit on the go. I prefer the grid pages of Doane Paper for my travel books and have a journal notebook for my main designs.
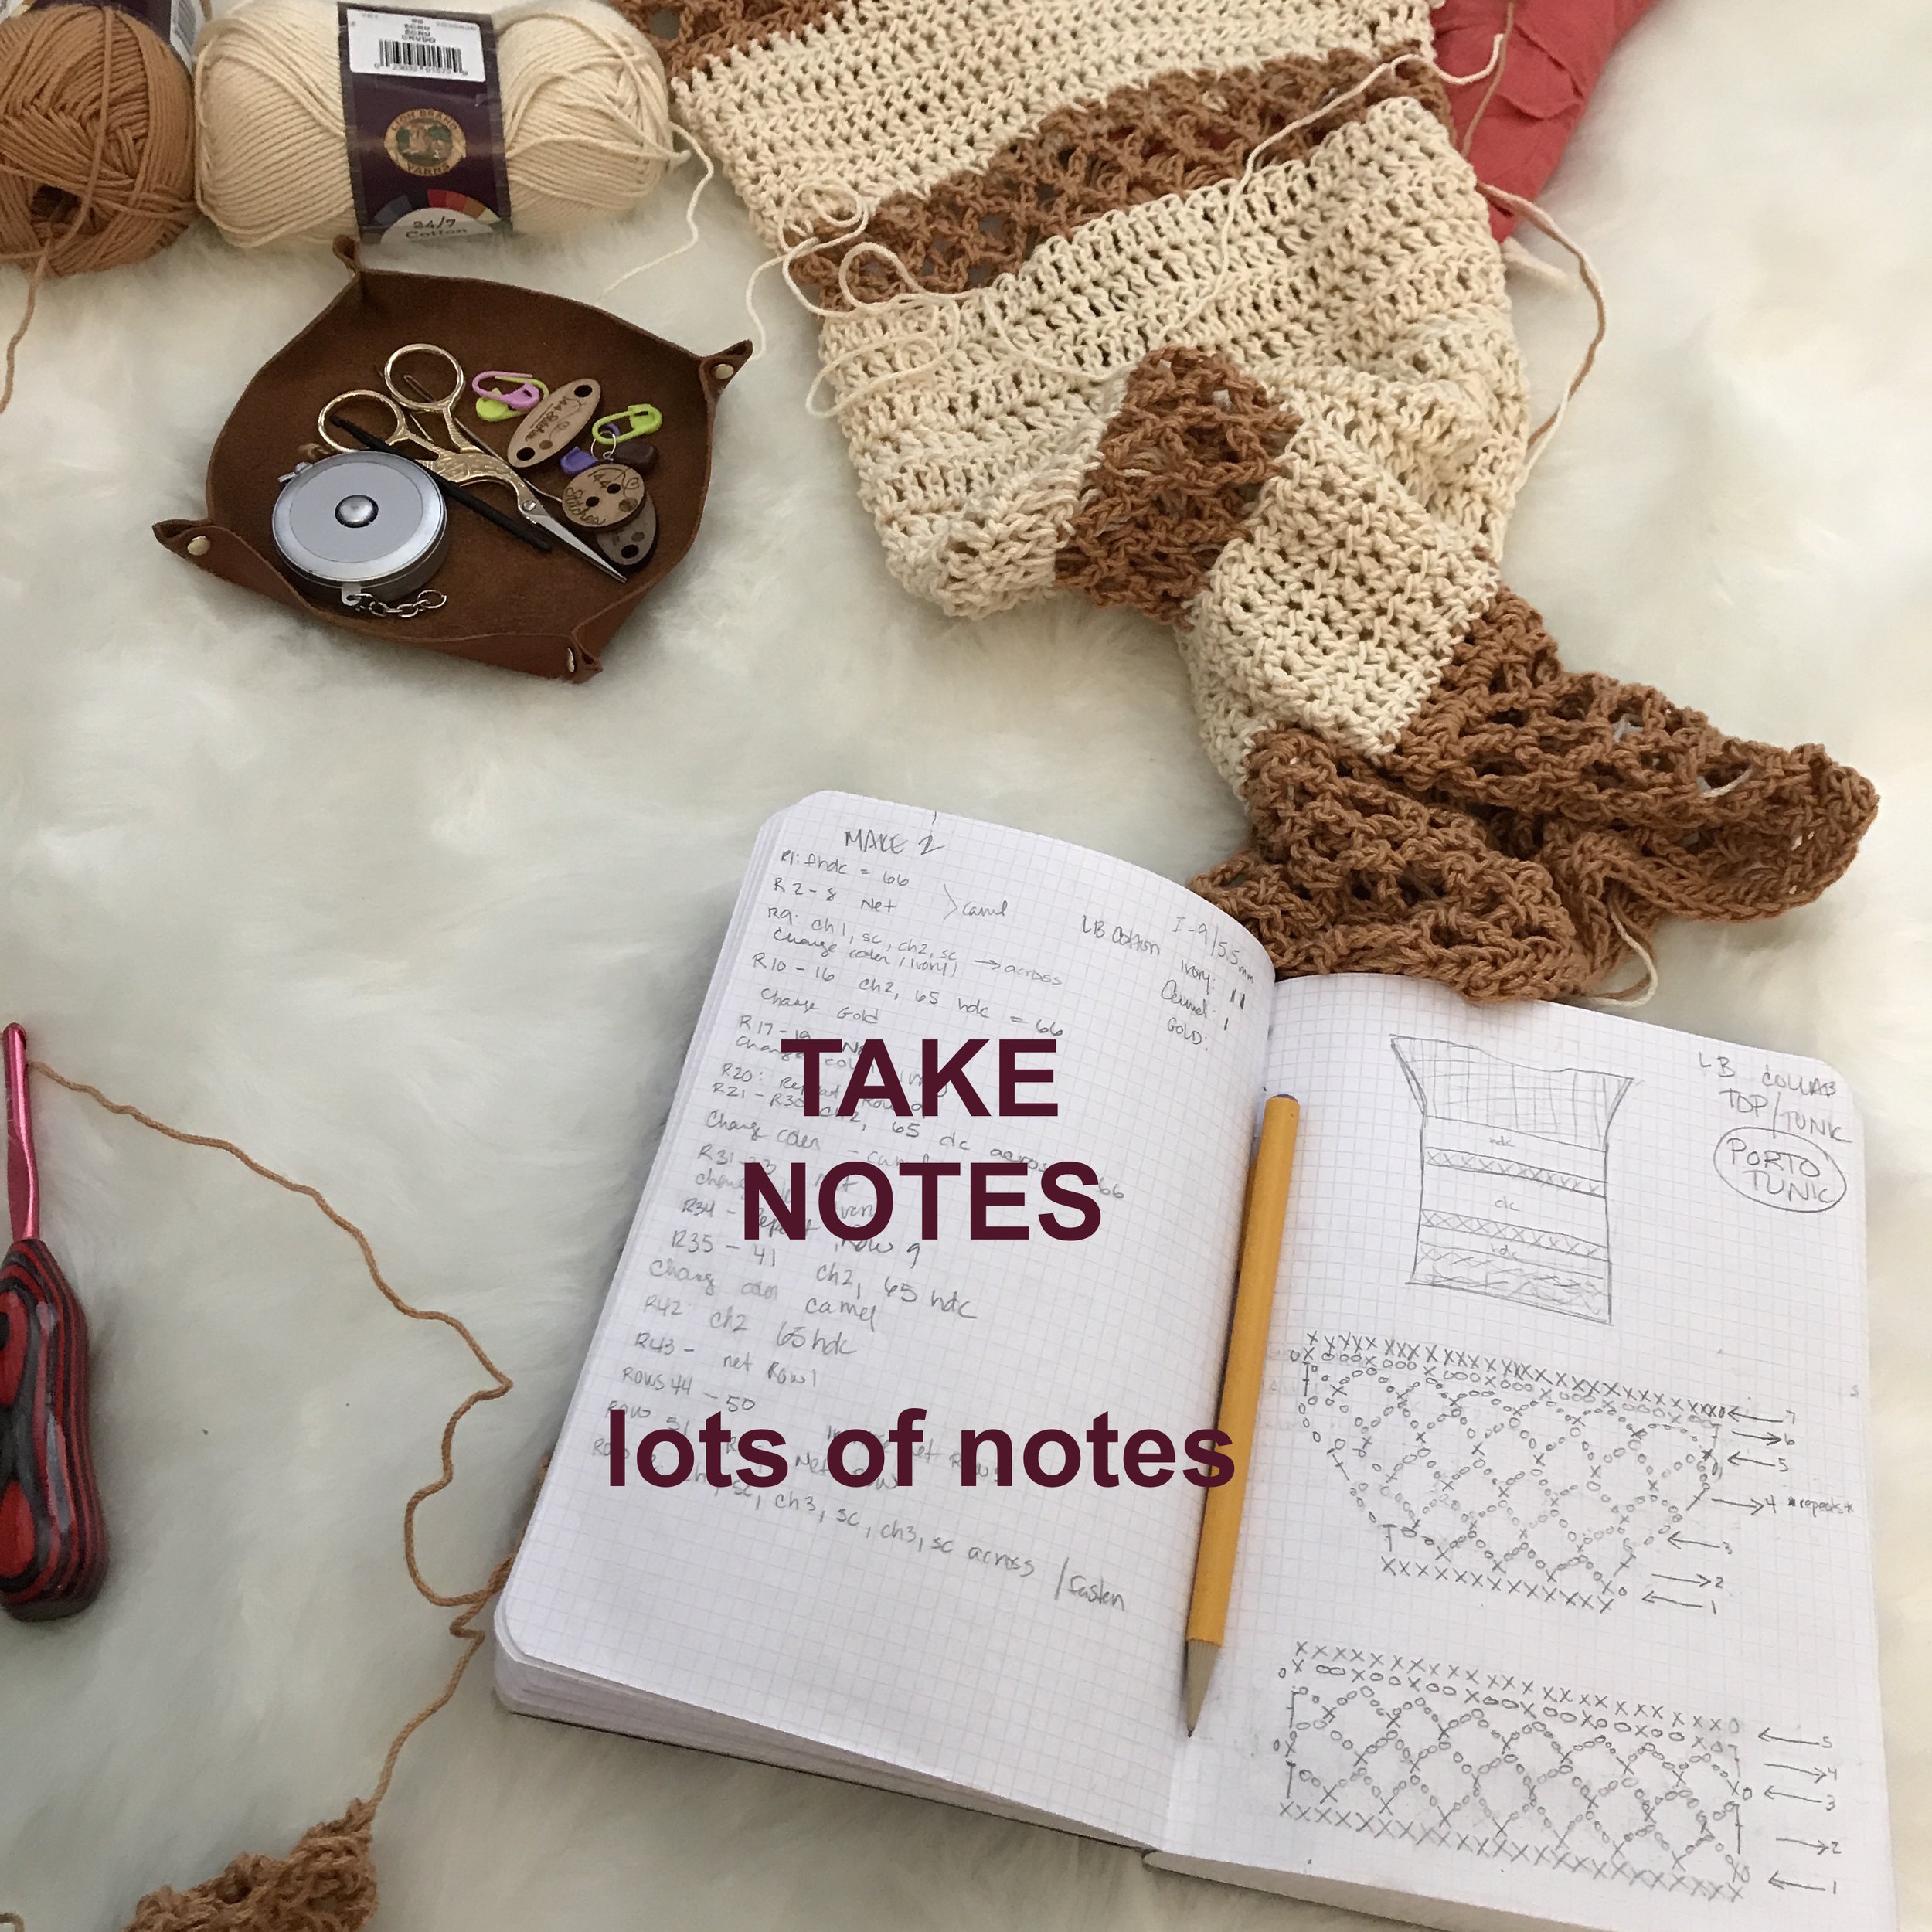
My note process is twofold: I write down what I do in words, but I also draw the stitchwork. This is known as Charting. I know it is intimidating to many, but the truth is that charting is a HUGE time saver. I can literally see the chart in my mind when I imagine what I want to create. I can visualize the stitches and it helps me create the exact look I am going for. It is also great for when I am in the groove and don't want to write all the words. I can just chart and come back later to fill in the complete steps.
Once I have got my notes and finished garment it is time to write up that pattern. Woo Hoo! Now starts the real work and is much less fun. Though, I have to admit... I kind of like this part too. As you sit down to turn your notes into your pattern, don't feel like things are "known" or make assumptions. The thing about writing a pattern is information: you want to give as much detail as you can to the person making it. Success is when I never hear from a customer except to show me what they have made. That means I have communicated clearly and they are able to create the item.
I have written enough patterns where now, I have a template that works for me and is set up to always give me prompts to add information. It is super helpful so I don't leave things out. Information your pattern should have at the start:
WHAT IS IT: What are people making? Who designed it? My cover page always has my logo, website, copyright detail, pattern name and photos right off the top. Boom!
WHAT DO YOU NEED: Remember, you are giving someone all the information to make your design. I always list supplies and stitches off the top. For stitches: I give the abbreviation and the stitch name. People crochet & knit all over the world so be clear. I refer to the Craft Yarn Council for best practices on abbreviations.
WHAT ELSE DO YOU NEED TO KNOW: Again, the most important thing is to communicate as much information as possible for the user to get the result they want. On my sizes I use standard sizing but also give information on specific areas (bust or waist, etc) as well as any information on how the garment fit is designed. Sizing details will vary based on what the pattern is for. Again, I refer to Craft Yarn Council standards for best practices on sizing.
GAUGE: OK... I could (and will) do a whole blog post on gauge. Gauge is my nemesis but it is essential. Gauge is the way to success, especially if you are using multiple stitches. In this case you need to communicate to the user how to achieve gauge and what stitch is used. No one has the exact same tension so in order to achieve the look, the user will need to know gauge.
Phew.... still with me? Now we get into the actual pattern... the meat and potatoes. YUM!
Design / Pattern Writing Essentials: Yarn, Coffee, Notebook, Markers, Tape Measure, Notions.
Take a look at some of the Free Patterns on this blog to get a feel for this part of the process. This is where you actually tell the people what steps to take so they can create the masterpiece you designed. But this is not the time to feature all of your creative writing skills. Less is more here. No fluff. Just clear and precise directions.
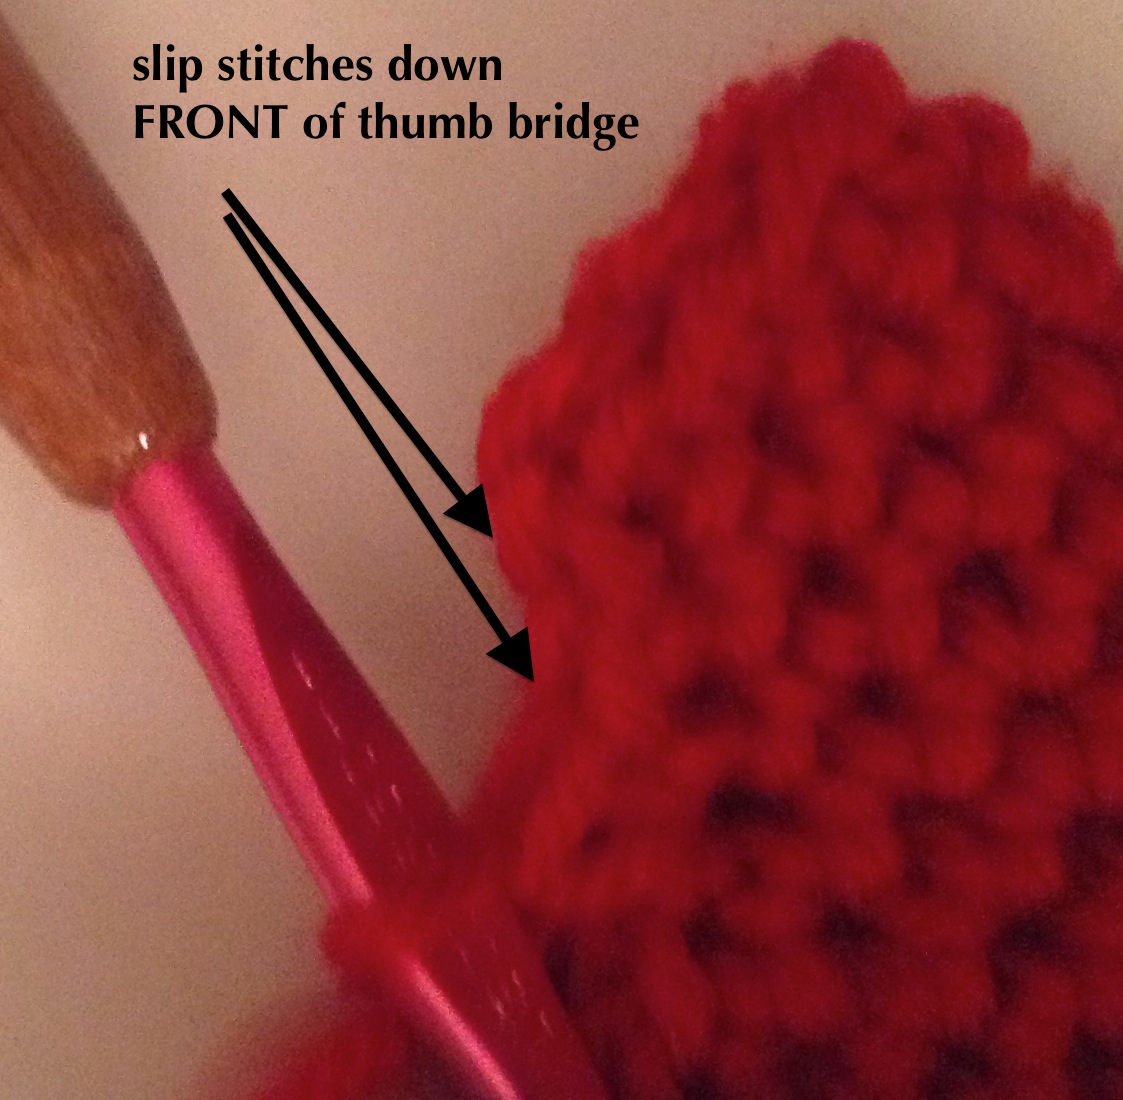
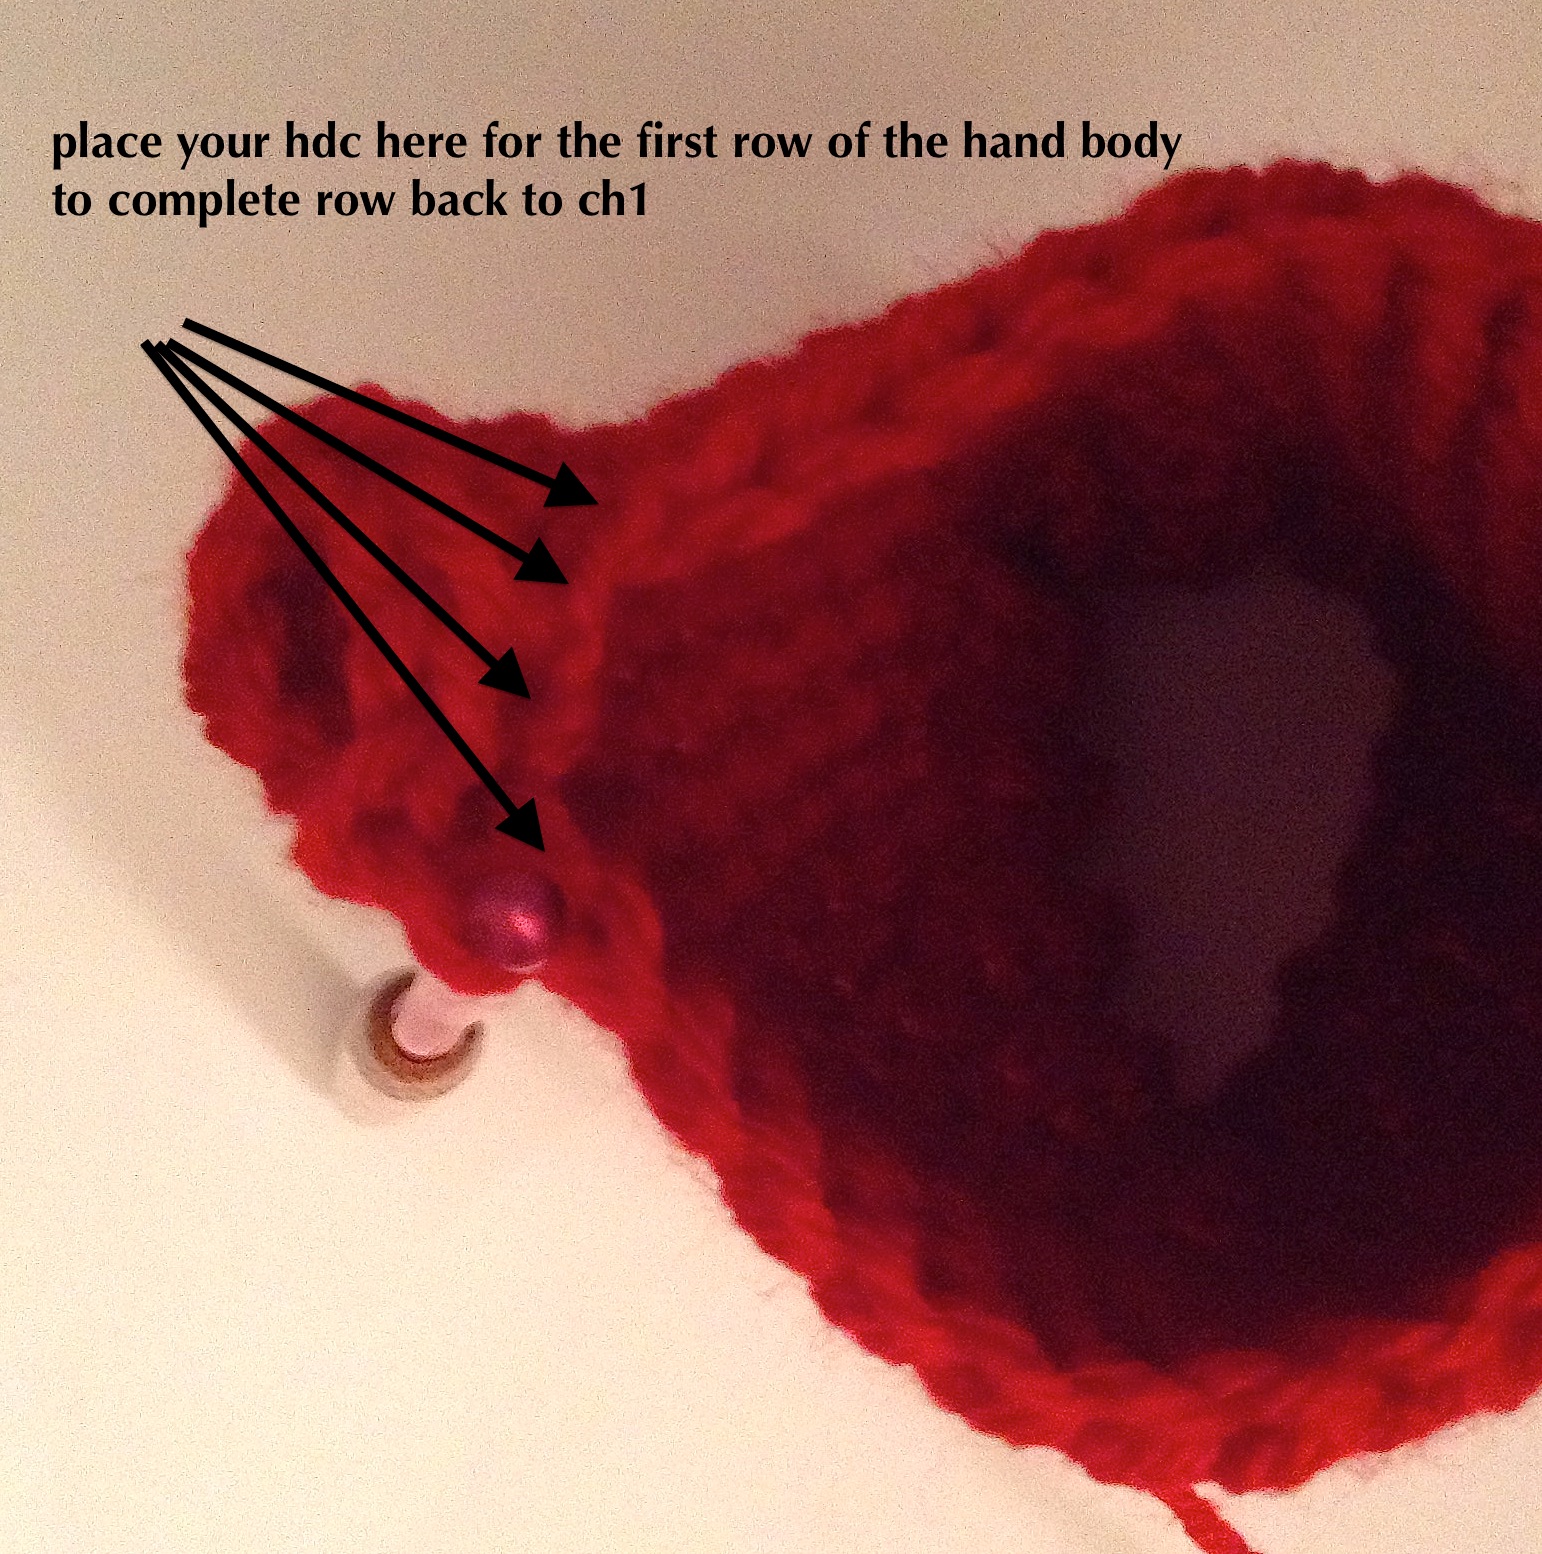
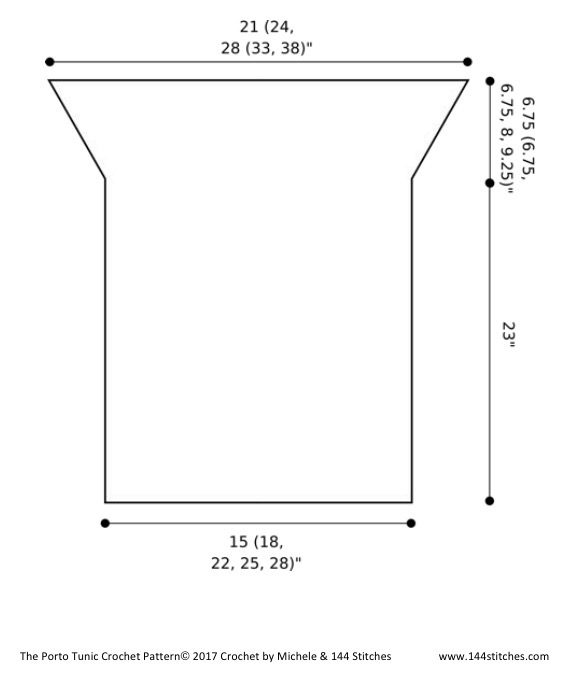
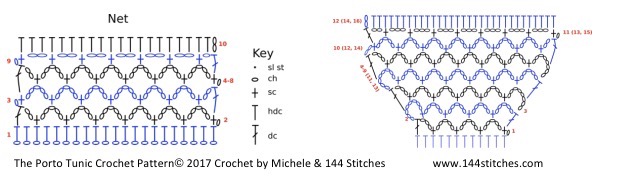
And anyone who has purchased my patterns knows that I try to lay out the steps concisely and clearly as well as include charts and schematics. It is ok if you do not know how to do charts or schematics. You can also include photos if that best illustrates what needs to be done. As long as you are clearly laying that road map out then you are all good.
OK. So you've got your item made, notes transcribed into steps to follow and you've added photos or charts as needed. GO YOU!!!! You have nearly got yourself a pattern. Have a sip of coffee and get ready for the home stretch.

Give the pattern a once over, then a twice over, and maybe even a third look to scan for mistakes & make sure you got all of your notes from your notebook on there. This is the point where I would send my pattern off for technical editing. This is basically the process where the pattern is checked by a pro. The math is checked. The schematics are added (if they haven't been already) or checked. The pattern is checked to follow best practices and standards set by the Craft Yarn Council and such. This is a step I know many do not take because it costs money. For me, as a professional pattern writer it is essential.
So now here you are: You have written, checked and re-checked your pattern. You have had the math checked and tech edited the language. You are almost ready to hit that publish button.
But first - you need to take it out for a spin. Grab some of your fiber friends and see if anyone is available to test your pattern out. Often times I miss things. It happens. In June I published 24 patterns that month. I would be lying if I said they were all perfect out of the gate!
Having fiber friends test your pattern is an invaluable opportunity for feedback from everything to gauge to fit to stitch counts to grammar to you name it. I am fortunate to have a great pool of testers and would not get my patterns out there without them.
Now you've had an idea, you've brought it to life and created a way for OTHERS TO CREATE. Woo Hoo! Publish your pattern and do a little dance.
Can't wait to see all of your design ideas coming to life. Happy designing.
And see part 2 of this post here