Get Organized: Hooks & Needles

As a new knitter, I've quickly started collecting a variety of knitting needles and supplies. I've been trying my best to keep organized and shop smart so as not to amass a pile of things I won't use for the long run. But I know I needed a better way to store it all than using a vase on my yarn shelf. Especially since I travel so much. The vase won't travel well šŸ˜‰

Since I have two crochet hook cases that I love from Atelier de Soyun on Etsy,  I decided to go back and see if she could make me a knitting needle case. She had some in her shop but I wanted something that would hold all my gak in one case. I sent Soyun a description of the supplies I had and some of my needles are F-A-T, some others are loooooong and I explained that I wanted to make sure they would all fit into a single case. I was so excited when she said it could easily be done. YES!

Well, I could not be more thrilled with this purchase.

My knitting needle case is perfect!  Yup... She nailed it. Every needle fits, even my F-A-T ones and long ones. She even added pockets for my shorter hat making needle sets as well as pockets for my circular needles. Every needle has its place and that makes my heart happy. I've got my needles all organized and ready for when I need them or when I travel.

While I was browsing her shop I noticed her lovely project bags so I also got myself one for my on the go days.  The project bag is so amazingly well crafted and has inside pockets for organizing my supplies and notions. It's the exact size I needed and holds enough yarn and supplies for projects on the go. I am particularly happy with the drawstring close for when I toss that bag in the backseat (come on, we've all done it then cried when the yarn spilled out). I am now ready for travel!

This is my third case from Soyun and I cannot recommend this shop high enough. How do you stay organized with your hooks, needles & notions? Share in the comments below.

POS Credit Card Readers: Which Is Best For You

Woo Hoo it is summer festival & craft fair season. That means we get to get outside, set up our pop-up shops & tables to show off our wares. Since I sell warm weather cozy wear, Summer festival season is something I enjoy only as a spectator and customer. But I do love the vibes.   

One question many handmade artisans have is about payment processing, especially since not many people carry cash anymore. I did some research when I was starting to sell at the One Of A Kind Show in Chicago and found that I am a fan of Square. Here is a link to sign up and get a free reader and get your first $1000 free processing.  (Yes I get credit for this link but no that is not a factor in my analysis)

For me, it is just easy and the fee is not too bad. I like the fact that I can get unlimited free card readers so when the booth is busy more than one of us can process sales. I like the reporting analysis because it is easy to read and lets me know what my best selling items are.

The inventory management system was a bit labor intensive to set up but they all are so this isn't a deterrent to me. I would have to set it up anywhere. It is extremely helpful to go through this step to know what really sells and what trends are happening with my products. It also gives me a good overview of traffic patterns in my booth which is extremely helpful.

I have a friend who uses the Etsy reader because it helps her presence on Etsy by increasing sales in her shop. For me, that is not a factor. Plus, I do not like the fact that it makes me subject to Etsy TOU which means I cannot directly market to those customers unless they explicitly sign up for my emails. Similar to why I don't like Pattern by Etsy, it means I am doing work for the Etsy brand instead of my own.

Whatever card reader & POS system you choose, be sure it is right for you and your needs. Below is a breakdown of the three I researched. I know that Intuit also has a card reader / POS system, but I am not familiar with it so you may want to explore that as well.

Happy Market Day season everyone

Ā 

Wind 'Em Up! My Yarn Winding DIY Swift

As I started to work with more high end fibers I started to need a better yarn management system. Mostly because they come in hanks not skeins and without winding them I would end up with a mess. I realized very quickly I would need a yarn winder and a yarn swift. But Yarn Swifts are not cheap!

I had always loved the look of wooden Swifts for yarn but couldn't afford one nor did I have the space for one to be mounted. I mean $40-$120 is pretty steep when you are starting out. It also isn't efficient for me space wise. My studio is small. A magnificent swift would have to remain a "someday" not a solution to the current need.

As I started to look around I didn't find anything that fit my studio needs. My studio is lined with cubby shelves (more on that later when we talk storage and workspace efficiency) and since I also use these shelves for my booth at the One Of A Kind Show in Chicago, I couldn't permanently mount a swift to them.

So we took a ride to home Depot and about $12 later I had my very own perfect yarn winder. As time went on and my business grew I upgraded the hand crank to an electric winder I purchased online. But my $12 makeshift swift is still in place and works like a charm. Photos below in case you want to build your own.

If you want to splurge and get a yarn swift, this one from Knit Picks gets rave reviews but I have not personally used it.

A Creative Friendship Story

This is a cool story:

I've known Sabina at Crochet Gallery for many years - since she started her shop I believe. I was looking for a triangle scarf for myself on Etsy and that is how I discovered her shop. I hate making things for myself, so I am more than happy to support another artisan to make something for me.  Since then, I have commissioned work for myself, and occasionally for my customers as well, and over the years we've enjoyed chatting about yarn and growing our businesses. Over time we have become friends; but we've never "met" in person.

Last week, Sabina posted about having s'mores on Instagram. I commented: "I want crochet & s'mores" and then she replied "come on down".

I thought about it and ...  it is slow season, I can crochet anywhere, I mean... why not! Since I was about to take a road trip anyway, I decided to change my plans and leave the next day. Once I reached her general area, I sent an email: "want to have s'mores tomorrow?" The reply was funny because even though we'd never "met" I could imagine her as she typed it. It read: "Seriously?"

I said sure... and a few emails later, just like that, the next day we were two old (and new friends) hanging out bonding over s'mores, crochet and yarn. If you follow me on Instagram you saw the awesome fire pit .

Sabina welcomed me and it was instant connection. We laughed, traded stories and she even made home cooked curry and a Bosnian bread for us to enjoy. (The woman is a dynamo and does it ALL). Oh, and yes, s'mores did indeed happen for dessert!

The next morning we enjoyed coffee, more laughs and she even taught me how to knit - which I've been wanting to work on and learn for so long. That was a huge bonus!

It was probably one of the best ideas I have ever had and so much fun in a short time. The time visiting flew by in fact. It was as if we'd always been friends, which we kind of have. Sabina is amazing and it was a blast hanging out.

I will always be grateful for the way we connected so many years ago and love the way this craft world really brings people together.   šŸ’–šŸŒŗšŸŒ·

Shrug It Off With We Are Knitters

I am so incredibly excited to share this with you guys. If you follow my personal Instagram, you know I have been on a weight loss journey and am down 34 lbs so far. While this is awesome, it creates some fashion challenges. See, I have an oversized shrug from Anthropologie  that I LOVE but it is just huge now. I swim in it. It is my Go-To spring and summer item so I am having a hard time parting with it without replacement. Then I looked at it and thought... Wait! I can make that.

Right about the same time, I had just frogged my 4th version of a baby blanket pattern I was developing in partnership with We Are Knitters (don't you just love them?). I was sitting there, staring at a pile of amazing Cotton Wool and it hit me... scrap the blankie and make a shrug. I let my WAK contact know my plan and they were also excited. Because... who doesn't love a shrug? Brilliant!

It came together perfectly. And we all know that rarely happens so I just know it was meant to be. Like my friend Amy says, "sometimes the yarn just speaks to you and tells you what it wants to be". She is so right!

I wanted to create a shrug that would be both fashionable and functional. Perfect for cooler evenings, over a swimsuit or as just a cozy accessory. An all season go-to staple item for my closet. I also wanted a pattern that would work for any size or shape, because we woman come in all shapes and sizes right :-)

It has been a blast designing this and I shared some of the process and progress on Instagram. This pattern is so much fun and I could not be happier with the outcome.

And now just for our community get this: The amazing team at We Are Knitters are sponsoring a giveaway. Enter below to win EVERYTHING you need to make this Shrug yourself. Seriously! All the happiness of a shrug in a WAK Kit. YEAH!!!!

That's not all, if you don't want to wait, you can now buy the pattern here and get 20% off your Cotton Wool from We Are Knitters with code WAK144Stitches. I mean, COME ON!!! If you were looking for your amazing next summer project, this is it.

BIG THANK YOU to We Are Knitters. This has been an amazing collaboration experience. And Enter blow to win the Kit!

Do What You Love, Love What You Do

Sunday Reflections:

my happy place: on location

Sunday morning. I'm up early, coffee in hand and sitting here working on my Lookbook and Marketing materials for the 2016-17 season. I couldn't be happier. 

Last year at this time I was stressed. Stretched thin. Trying to squeeze hours into already packed days. I was sad that my time to create and crochet was limited to but a few hours a day and I wasn't finding much joy in it at all because my mind was filled with all the things I needed to do. I was canceling and juggling plans and meetings and always running behind.

I had several projects in play at the time: Prepping for the launch of this blog (which is my passion project for a community that I deeply love); launching an extension of the blog: a consulting agency to assist other artisans become successful in their marketing & social media efforts; development of my tech start up (which was my brainchild and baby); designing new projects AND prepping to go back on location for a new show for several months. Not to mention family and home responsibilities.

Then I had the light-bulb moment.

While meeting with the seed money investor for my tech start up, he said something that changed everything. I do not think he anticipated the answer he got, but it was the right one.

my happy place: cozy crochet corner

He said: Michele, something has to give. To move forward you need to be 100% in this. You are spread too thin and before we invest further I need you 100% in this. Skin in the game beyond finance, this has to be your sole focus.

In that single moment, without even needing to think about it I had total clarity. He was right. While my idea and this project was amazing, it wasn't what I wanted to pursue 100% of my time. I wasn't willing to give up my other loves. Other loves which, oddly as it may be, compliment each other and give my life balance.

Look, walking away from my incredibly needed, viable start-up with seed money on the table was not easy. Especially since it fed my inner geek and I truly love the tech & start up community. But it was easier than I imagined and that's how I know it was right and why I've never looked back with regret. The same with walking away from the consulting agency.

I'm a creative. I'm a small business owner. I am not an entrepreneur. And because I know the difference I'm able to invest my time and resources into the places they are needed and the places that will grow. This clarity allows me to have focus which is essential when it is time for the tough decisions. By walking away from those 2 projects I brought the balance and joy back to my life and as a result, my business and this blog are thriving.

This doesn't mean I won't have other ideas and be part of new projects. This just means I have clarity and focus and both of those things feed my passion which leads me to success. But more importantly, it leads me to happiness. I am truly doing what I love and loving what I do!

Are you spreading yourself too thin?  Do you need to cut some projects loose? I encourage you to take a deep honest personal inventory this week. It will change your life like it did for me.

Taking A Trip With Super Traveller

Me & Kate in the Dragonfly Fibers booth

I attended my first Stitches Midwest event in 2013.  I had no idea what I was in for though. I arrived early the first day to check out the market place before my class. It was instant sensory overload of the most magnificent kind. Yarn, tools, supplies, more yarn and so many wonderful people. It was fabulous.

Though a bit overwhelmed, one Fiber Artist's booth stood out. I was drawn to the amazing vibrant colorways of Dragonfly Fibers. And once I started touching and felt the texture of the merino... well, thankfully I was in my element or I would have gotten strange looks I bet.

Kate Chiocchio, the artist is a wonderful woman and I knew I had to start working with her in an instant. Within a week I placed my first order and have been placing more orders since.

The items I create with Dragonfly Fibers are always well received in my shop and everyone loves the colors. They are some of my biggest sellers at the Chicago One Of A kind Show each year.

Bags Of Yarn Make Me Smile

In 2014, when I visited Kate again at Stitches Midwest to pick up my most recent order, I got the idea to design patterns for the Super Traveller which is my favorite of her offerings.  I just cannot get enough of it. It is a super wash merino bulky fiber that works up so wonderfully. The rich colors come alive with each stitch. I wanted to bring the personality of the color of the fiber to life through a collection. 

Of course, you know how it goes, add an idea to the To Do list and get back to work on other projects and eventually try to get to that idea on the list of many.

Rockin' The First of The New Roma Traveller Puff Stitch Hats

Ā 

Then, about 8 weeks ago I got my latest shipment of Dragonfly Fibers Super Traveller and it spoke to me. The colors, the texture... So inspired, it stopped me in my tracks and I got to work on some new patterns right away. No more delay!

I had been working with the Puff Stitch (one of my favorites) when my yarn arrived and I knew it would lend itself so well to the bulky texture of the Dragonfly Super Traveller.

I started with a new beanie. It is actually an update on an old pattern of mine that I never really loved. It worked up so quickly and so perfectly it was like magic. Now, it is my fave hat instantly!

And, that magical combination led me to design the Puff The Magic Stitch Collection. It is divinely cozy, works up so well and takes you on a trip through the rainbow of color with variations on a stitch.

So, pick a pattern, get some Dragonfly Fibers Super Traveller and you too will fall in love. They are available on Ravelry, my site and Etsy pattern shop.

Ā 

Five Product Photography Hacks For A Homemade Studio

Whether it is for your website, promotional materials or to post on social media, product photography is crucial for success.

But what if you are not a pro photographer with full light kit and studio? Here are five tips, tricks and hacks to help you DIY yourself into better product shots.


Tip 1: Change Your Scene
You can order very inexpensive backdrops from Amazon. I got the Elle Bella Paper Backdrops shown here for $10 each! Then just tape it to the wall that gets the best light and boom: you have a studio.

Or, if you are so inclined you can go the extra mile and order a set of stands to hang the backdrop from. I got this Limo Studio set shown here for $35 on Amazon.

Tip 2: Clean Light Box DIY
If you have smaller products and want that clean white lightbox look, hit up your local craft shop and get 2 pieces of poster board. I got the pieces here for a total of $3 at my local Hobby Lobby.


Tip 3: Steady As You Go
Even if you are using your phone, as I personally do about 50% of the time, invest in a tripod. I got the one here for $25 from Amazon and spent another $10 on the Jelly Fish Spring Mount for when I use my iPhone.

Tip 4:  DIY Floor & Backdrop Board
The truth is, sometimes it is just better to go with the classics and drop your product on the floor in a well lit room and shoot overhead. But what if your home rocks a 1970's avocado shag carpet? No prob!

Get yourself one of the $10 paper backdrops I mentioned in tip #1, grab a $2 piece of foam board and glue the paper to the foam board. Instant flat board backdrop. Ideal for almost any product and portable to go wherever you have the light!

If the light hits that one impossible sweet spot - no worries! Just get creative. I often use drawers to prop up my backdrop board in the bedroom that has the best afternoon light.  


Tip 5: Use Props
I realize it may sound counter intuitive because you want to keep focus and showcase your product, but the truth is that your image tells a story about your product. So use props to help tell that story and maintain your brand message. I love this mini chalk board I got on clearance for $2.50 but you can also use whatever props are in your home and fit your  brand message and vibe.
 

Hope these tips help you get started to better product photography. Feel free to also share your own tips and hacks below in comments. Happy shooting :-)

Donā€™t Just Be Busy: Be Productive! A Simple Tool for Increasing Daily Productivity

Guest post By Alissa M. Trumbull

Sometimes I have these mornings where Iā€™m paralyzed in bed. I canā€™t move. I wonā€™t move. Iā€™ve spent the night mulling over what seems like 100 things that need to get done the second my feet hit the floor. Instead of getting up and running, my head feels busy and not productive, and I spend the day running circles around myself like a dog chasing its tail.

I know that I, like many others, continually look for ways to increase productivity. Some days are hard: I might have writing to do, errands to run, a vast number of emails to read and reply higher than a preschooler can count, and a job or two outside the house that require me to be dark on social.

A few weeks ago as a guest on #H2HChat, Brian Moran shared what he does to be more productive every day. Brian broke it down for us and showed how tasks on packed days ā€“ and the easy ones, too ā€“ can be grouped into four categories:

Urgent ā€“ It has to get done today. Donā€™t go to sleep until itā€™s finished.

Important ā€“ It really needs to get done today. Donā€™t get in trouble for not doing it.

Everyday ā€“ The daily routine. Muscle memory items.

Nonessential ā€“ If it doesnā€™t get done today, it can happen tomorrow. Itā€™s okay to sleep on it.

This blew my mind. Such a simple categorization would allow me to provide better structure and more meaningful organization to my day. As a big fan of post-its, Iā€™ve taken to laying out each day since then in these quadrants.

In the same chat, Brian noted, ā€œToday is for execution; planning happens the night before.ā€ So, now I wake up in the morning with today laid out from the previous evening. As my day goes on, I am able to remove items from my digital list. Ideally, Iā€™ve done everything in the first three categories by the end of each day (and god forbid I forget to feed the cats!).

Itā€™s amazing how my overall stress level has decreased and my productivity has increased during the past few weeks as Iā€™ve utilized this new system. I no longer wake up fearing a lengthy to-do list. Instead, the visual division positively impacts my day, allowing me to be more organized, less busy, and more fruitful in my day-to-day activities.

I feel better. My relationships are better. My work is better. My life is better.

ABOUT Alissa:
Alissa is a Community Gardener for BTC Revolutions. Her purpose in life is to help people find their aha moments. She lives in Denver with her husband and their two cats, and gets to see the mountains every day.

Got ā€˜Gram-Game? An Instagram Primer For Artisans & Small Biz

Letā€™s take a deep dive into Instagram as part of the Stitch & Hustle Social Media Series. If you are not using Instagram yet, I implore you to see if it is a good platform for your brand. I have a feeling it will be.

I love Instagram ā€“ in fact it is my favorite of all the platforms.  It is an incredible tool to grow you business, connect with other businesses and customers.  I break it down here into 3 segments: Posts, Community, and Metrics.

Since it all starts with what you post, letā€™s talk about that first.

I think of Instagram as the advanced Social Media version of the pre-school game Show & Tell. You have two opportunities to tell your brand story when you post on Instagram: in the photo and in the text.  A great Instagram post is more than just a pretty picture. It connects and tells a story.

You can also think of Instagram posts as mini blog posts. That way you are always trying to connect with every post and share with intent & purpose. And remember ā€“ every post is a representation of your brand.

First up: The Photo

Knitwear designer Ozetta Takes Us Into Her Cozy Studio On Her Instagram

Knitwear designer Ozetta Takes Us Into Her Cozy Studio On Her Instagram

The photo is the draw. It is the eye candy. It is what makes Instagram Instagram. Your images should give a cohesive theme and brand message. You can focus on reflecting the brand lifestyle, inspirations,  as well as just the product itself.  Give a glimpse to your behind the scenes or process. SHOW your brand message.

If you are starting out or have a personal small brand this still matters. For example a friend of mine was asking how to up her IG game for her home chef account. I say ā€“ go beyond the finished meal and glossy pics.  As a healthy home chef show ingredients in their natural setting. Show markets and shopping carts. Show the process. Show the meal prep. Instagram allows video: show us your knife skills and dice something! There are so many ways to mix things up in a single image that reflects your brand and community.

Building your Instagram brand profile for personal account or your business requires a cohesive and consistent message in all your posts.

On a technical side; You can use almost any camera really. There are so many apps and filters that sometimes your phone is your best option. Plus, itā€™s always handy. For specific product display or branding purposes, you may want to consider a DSLR or even hiring or collaborating with a photographer. But again, getting started with your phone is all you need.

If you want to take a quick course on turning your phone into your camera, I suggest one on Craftsy or this one on CraftU. But nothing beats playing around with it and learning hands on, learning when the best time of day gives you the best lighting for your product, etc. No matter what filters or tools you use, nothing can ā€œfixā€ a badly lit photo so these are important things to know.

Mud and Yarn Takes Us behind the Scenes on Her Instagram to See her Process and Even Inside her Kiln

Mud and Yarn Takes Us behind the Scenes on Her Instagram to See her Process and Even Inside her Kiln

A couple of apps I personally love are Camera+, VSCO, & PicStitch. Each has various features that allow me to manipulate the photo to tell the story I want. Be careful with filters though. They are not all right for your brand image even though they work for others. You can also control the intensity of the filter with a simple click. So play around with filters and apps to find what works best for you.

Stay away from collages. While you want to show all the awesome uses and variations of your product, the truth is that they are distracting and do not convey a clear story or brand message.

One photo. One story. Minus the rare exception, that is my Instagram rule of thumb.

And have fun! Itā€™s true this is work and you have a marketing purpose but having fun is just as important. It comes through in the image (I firmly believe this). So be creative. Play around with various angles of your product and in various locations and settings for your product. It is a social media platform not a catalogue shoot!

Next up: The Text

While yes, the photo should tell a story ā€“ your text should enhance that story. Go deeper to connect with your community. Maybe talk about your process. Or share personal detail about the day. Whatever you choose to share it should be with intent to connect with your community and stay within your brand message.

The text is a great place to offer something to your community. As we have talked about is the intent of this blog, our hustle should be to help others succeed and to be of service. No reason not to do that with your Instagram. Offer a tip. Offer insight to a design. 

Whatever your brand message, this is a great opportunity to start a conversation with your community. I try to leave my posts with a question, invitation to comment or call to action. Invite the community to engage.

Back to the home chef example; this could be where she talks about the difference between one ingredient over another.  Or offer the community a quick time saving tip to be more efficient. Maybe ask the community what their favorite herb or ingredient is then in the next post refer back to that favorite. Talk about the recipe and why you love it (which gives a glimpse to you). Make it about more than just the picture.

I am strongly against lengthy text every time. Mix it up. Keep the audience interested. Again, this is another opportunity to connect. Donā€™t miss out.

Another important aspect of text is hashtags. I could do a whole spiel on hashtag etiquette but I will refrain. Just know that within the main post 2-5 relevant hashtags should be the max. If you want to add another round of relevant hashtags you can do so in a comment. Use tags that your audience will seek out so they can find you.  Think like a customer!

So now you have a great image and interesting post. Posting it is only the first step. Now we get into your community.

Crochet & Knitwear Artisan Crochet Gallery Lets Us Experience Her beautiful Surroundings and Inspiration on Her Instagram Account

Crochet & Knitwear Artisan Crochet Gallery Lets Us Experience Her beautiful Surroundings and Inspiration on Her Instagram Account

Social Media platforms call them ā€œfollowersā€ or ā€œfansā€ but I call people part of your community. Interaction & engagement goes both ways and, as you know from the purpose of this blog, I am a firm believer in giving more than you take.

When new people follow you, check out their page. If it is interesting or appealing to you, follow back. Read their posts. Comment and start a conversation. Make that effort to reach out. It could be as simple as a ā€œlikeā€ or happy face. Whatever your method, connect. Find accounts that are aligned with your brand. Interact and comment.  Donā€™t wait for people to come to you. Go to them!

When people comment on your post thank them. An unanswered comment is akin to saying ā€œI donā€™t care what you sayā€ and WE DO CARE what our community says. So BE social. Respond. Interact. Too often we think Social Media is about putting it out there. Itā€™s not. It is SOCIAL Media. Read my detailed post on that topic here.

Which takes me to my next point on community: Listen!!!  The importance of listening to what your community is talking about cannot be understated . What interests them? What problems can you help them solve? What are they talking about matters because it is your opportunity to connect.

So now youā€™ve posted and listened and built community. But how do you know if itā€™s working?

Like any Social Media or Marketing effort, you need to have an intentional plan & strategy going in. You want to grow. You want to increase followers and ultimately generate brand loyalty and sales.  Develop a plan that works for you to achieve those goals. Then Track. Track more. Track, shift and grow.

Obviously if you see an uptick in likes, comments and ā€œfollowersā€ you will know you are on to something. But I suggest you develop KPIā€™s that will help you meet your goals and know where to spend your time and resources and get an overview of what posts are hitting the mark. I personally use Iconosquare and you can try it free for 30 days.

Over the course of your first 30 days of posting with purpose as described above, you should be able to clearly see what resonates with your community and attracts new followers. That is what you build on to grow and ultimately generate sales.

Instagram should be fun but it is also work. So get to work and have some fun!
And don't forget to follow Stitch & Hustle on Instagram & join the community!

Ā 


Ā 

Ā 

Ā 

Pattern by Etsy: Is It Really Your Own Website?

photo from Etsy blog

photo from Etsy blog

You may have heard, either by news article, blog or an email from Etsy, that Etsy has launched a new Web Service: Pattern By Etsy and are rolling it out this week. Here is a link to the Etsy blog launching the service and the Entrepreneur post.

I can't say I am a fan of this but to serve you best, I will be objective...

On second thought, nah.. let me just lay it out for you. I am finding more bad than good here.

Let's start with the name: Pattern by Etsy. Who thought of this malarkey? I mean really?

In my first 24 hours using the service and reaching out to their customer support there was instant confusion, more than once. You see, I (like many many others) sell my original patterns on Etsy. So their support thought I was having an issue with a Pattern transaction. You can imagine how frustrating it gets spending the first group of emails trying to get them to understand I am talking about their feature not my patterns. Even when my email to support said "I am having trouble with the new website program Pattern by Etsy"... they still came back with instructions on how to download a digital pattern. No kidding.

It blows my mind that they would name it Pattern by Etsy. But moving on...

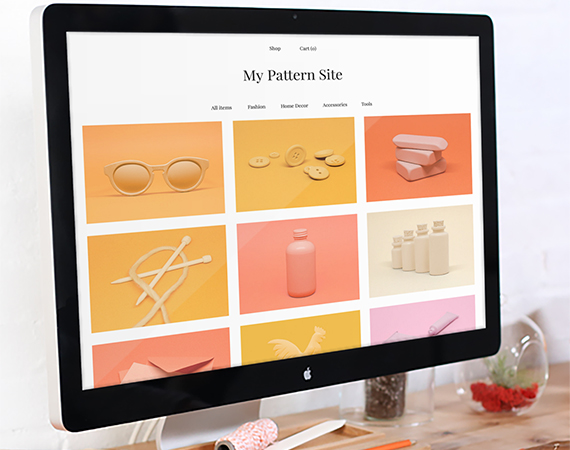
Pattern by Etsy is slick. It is glossy and pretty and easy to use. The set up process is a matter of a few clicks. Because it is a mask of all the data Etsy already has in your Etsy shop, there is no import. The items are linked on the back end.

You can select from a few Theme Templates and each allows a bit of customization. The customization is quite limited though. You cannot "add pages" or really customize the type of content on your site too far away from what is already in your Etsy shop. The initial content from your Etsy shop comes over and you can edit as needed but again, within the parameters of what Etsy already allows. But it is easy to use and setting up the entire website took a matter of minutes.

At first glance, Pattern by Etsy has all the trappings to entice crafters, hobbyist and small business owners already using Etsy. But hold on... it also has limitations and constraints that make me tilt my eyes,  smirk and shake my head.

Going beyond the fact that Etsy takes 48-72 hours for your site to go live (which baffles me being that they are in fact a tech company) let's talk about the nitty gritty.

Pattern by Etsy is designed to keep you within the Etsy vortex. Similar to how Etsy itself works, Pattern by Etsy will not let you link to an outside site. For example, on the ā€œAboutā€ page, I wanted to link to my standalone site www.144stitches.com. The link would not go live forcing customers or site visitors to see the text but not have a clickable link. They would have to ā€œcopy & pasteā€ the text into their browser to get to my site. But If I put the link to my other Etsy shop, www.144stitches.etsy.com then the link is live. So you see, it is not actually "my website" as I am still playing by Etsy rules keeping the consumer and me, the vendor and in this case site owner within the Etsy vortex.

Additionally, Checkout is still run through the Etsy check out system.  So customers are still not buying from ā€œyouā€ but are re-routed back to Etsy. This means if they do not have an Etsy account, they will be required to create one.

You work hard, marketing your shop and promoting your work. You spend lots of man hours developing your brand and driving traffic to your new website. In fact, you spend the extra $16 per year Pattern by Etsy charges for your very own domain so you are not using the ā€œpatternbyetsy.comā€ extension to further drive traffic directly to your site and create brand name recognition.

But, in compliance with Etsy TOU, you are NOT allowed to collect emails of your customers or market to them once they have made a purchase. You see Etsy views them as "their" customers and only Etsy is allowed to use their email for marketing purposes.

So now you have your stand alone site doing Etsyā€™s legworkā€¦ not your own. Your brand is now linked to Etsy on a deeper level and all the work you do to get traffic and customers to your site is wasted as you cannot grow them into returning customers. Yes, you are paying for the privelege of doing Etsy's marketing.

Pattern by Etsy promotes Unlimited listings and that you do not have to pay a ā€œlisting feeā€ to add items. But you have to pay $15 per month and still have the listing fees due Etsy any time you add an item. And since you can ONLY add items by adding them to your Etsy shop there is no way around that fee even if you plan to drive traffic only to your new Pattern by Etsy website.

So now you are paying the $15 monthly fee, $16 annual fee for your domain and your Etsy listing fees of $0.20 per item and Etsy takes a 3.5% transaction fee per sale. These fees add up quick. Seriously do the math. and you have to still follow the Etsy TOU though you technically have your "own" website.

One last nail in the Pattern by Etsy coffin is the fact that if you have multiple Etsy shops (as I do) then you must create multiple Pattern by Etsy websites. Yup... they STILL will not allow a single account to operate multiple shops. So in my case, where I have 3 Etsy shops, take all those fees I just mentioned above and multiply it by three. Not to mention I would need 3 separate domains, 3 separate marketing plans, etc. I mean what a confusing headache!

Look, I love (and hate) Etsy. It is how I got my start and has opened so many doors for me. But Etsy today is very different than the Etsy of old and I really can't help but feel like Etsy is scrambling to create new revenue streams by making features that entice users but are just to keep investors happy now that the curtain has been pulled back. To me this feels haphazard and without much forethought for the user, which is the Etsy customer. And I am not talking about the consumer. I am talking about small businesses who use Etsy to sell their wares. Those are the Etsy customer. The money makers for Etsy through fees upon fees. Yet here we are again...

So what do you do?

You are not helpless and if you want your own website and domain go get it! But be responsible and check all the options. If you have big Etsy inventory and are attracted to the fact that Pattern by Etsy integrates your Etsy inventory, maybe you will consider IndieMade or SupaDupa or SquareSpace.  Each allows you to import your Etsy products and I know IndieMade syncs as you sell. And if you have multiple Etsy shops as mentioned above, you can import from multiple shops. Come on... no brainer!

I am a huge fan of these platforms and if you do the math you get way more bang for your buck and have true site ownership and control of your brand!

IndieMade, Supadupa & SquareSpace allow you to add pages and truly control your content as well as customize any of the free templates they provide. You can create a blog to share news and updates if you want. Pattern by Etsy simply allows you to link to an offsite blog, as long as you don't sell anything there because that would technically violate Etsy TOU.

Personally I use Squarespace, though I have used both IndieMade & SupaDupa in the past. For my needs, Squarespace is working great. On my current standalone sites (I have 2) I can list whatever I want (or not). My monthly fee includes listings, data storage, email and whatnot. 

Another option is to get a domain from GoDaddy or a similar service for a few bucks a year then have it direct to your Etsy shop. For as little as $5 a year you can have your very own domain to begin your branding and still it takes customers to your Etsy shop. There - I just saved you over $180 a year :-)

Bottom line is that there are tons of options if you are ready to take the leap, have your own website and begin building your brand beyond having an Etsy shop. I just think anyone considering Pattern by Etsy should take a beat and do the math and decide if it is really right for them. And I think that Etsy needs to find a way to reconnect with the Artisans who helped get it where it is.

Are you using Pattern by Etsy? Are you considering it? I am interested in your thoughts so please join the conversation in comments below.

UPDATE:

When I contacted Etsy to cancel my "free trial" within the 30 day period, I was informed that it would take SIXTY (60) days for me to get "ownership" of my domain, that I purchased through the sign up for Pattern by Etsy so not to use the "patternbyetsy" extension. I was baffled because didn't I "own" it when I paid for it? Nope. Etsy does. And because of ICANN restrictions, they cannot transfer for 60 days. With only a 30 day free trial, that forces me to at least pay for a month to be able to use the domain I purchased and is unacceptable.

I then asked, well could they at least forward the domain to my Etsy shop while I wait out the 60 days? Nope, they said they cannot because of the same ICANN rule. This is odd - especially since on GoDaddy, or anywhere else, I can pretty much forward a domain straight away.

In the end, their support apologized and extended my "free trial" to the full 60 day period. The problem is that for those 60 days, they are killing my google rankings because it appears as duplicate content as mentioned above. Thankfully I did not test Pattern by Etsy with either of my two main shops. But I will still feel the pinch.

Ā 

Ā 

Another Wood Shop Adventure: Business Card Holders

While I was looking around Pinterest for product display ideas, I also noticed some other interesting ideas to display  my business cards. Previously, I had them just stacked on the table near my products.

I would often have to neaten up the pile and point to where they were. Well not anymore!

With some left over wood from another project, and another afternoon in the wood shop with my husband I present my new business card displays.

We cut the approx 2 inch blocks off of a scrap wood slat. Then used the router to create slanted spaces. You want to be sure to slant so that your business cards display with your information showing.

Quite easy to make and I just love them.

Social Media: Not All Platforms Are Equal

Social Media has become a necessary tool for success. It is a gateway to the world for small independent business. It is a way to not only grow customers but also grow within the artisan or small business community. You can connect with service providers, fellow artists for collaborations, people who inspire you and so many others. The opportunity to connect is endless. But where do you start?

I think that many of the nuances available for social media to be a tool for success are missed because as a whole it is overwhelming. I get that.

In the Stitch & Hustle Social Media Series we will explore social media and how to make it work FOR you! How you can use social media to grow your brand and yourself.

The first step is to realize that not all social media platforms are created equal. This is an extremely vital factor in social media success. The term ā€œsocial mediaā€ is broad. To truly be successful you need to look at each platform as itā€™s own branch of social media and plan a strategy for each independently.

Of course, you can be lazy and lump them all together but you will be missing opportunities for success if you are not tailoring your approach and message for each platform.

Customers are smart. They know when they are being bombarded or your content is just posted without specific intent. Want an example?

If I post on Instagram, then hit the ā€œshareā€ to Facebook, Tumblr & Twitter option, the EXACT same piece of content is being posted to all four audiences. This has a few negative effects but here are the big ones:

  1. People who see your content, the SAME content, on multiple channels may start to ignore you or even unfollow you. They do not need to be bombarded with the same content every place they go.
    Ā 
  2. There is a good chance your content isnā€™t relevant in all places. (we will dive into relevancy later in the series). Twitter is real time. It moves fast. Facebook algorithm gives you more opportunities to be seen based on what is relevant to your audience. Currently Instagram is chronological but they too are switching to an algorithm based on audience activity. So your same piece of content is not relevant everywhere! That is ESSENTIAL to understand.

Yes, people do this. Yes I do this on occasion. But it should be done at minimum if at all and not with everything you share. For me, I do it when I know I have content relevant on multiple platforms. I may edit the post and tailor the language for each platform as well.

Where you share your content is just as important as whom you are aiming your content at and whom you are targeting. They are intertwined.

For this post, I will just look at what I call the big 3: Twitter, Facebook, Instagram.

Of course there are basic generalizations about each platform. But to develop a strategy for success, it is important to drill down further into each one and what they offer. You may in fact find some platforms arenā€™t for you at all. So drilling down into each platform is important to help you know where to focus and where to spend both time and money.

Statistics change often so you can only go by the best information available and then implement best practices. One statistic that seems to be consistent is age. Facebook audience is generally older users. Twitter & IG have a younger base. Why does this matter?

Well ā€“ if you put emoji everywhere (like I do) that may not go over as well on Facebook. Or while you can get away with a quick one liner or sarcastic quip on Twitter, that probably wonā€™t get the same response on Facebook. Knowing your audience and platform will help you tailor your campaign and ultimately reach more of the RIGHT people. And more of the RIGHT people is the ball game. Not just more people.

Another big difference is that while Twitter operates primarily in a world of anonymity, Facebook and IG are platforms where people get a bit more personal. It may be via people you actually ā€œknowā€ in person, or people who share like interests and are in shared groups.

Twitter and IG are more ā€œglobalā€ communities where as you will likely find Facebook audiences to be closer to home. It is also important to keep this in mind in the content you are creating to share. What plays well to your local audience may not hit the mark globally. This goes back to what I said earlier about sharing the same content everywhere may yield fewer results.

It is important to factor all of this and more when creating your campaigns. For example, if you do not ship worldwide, Facebook may be where you place more focus. And vice versa ā€“ if you are intentionally trying to grow globally you may focus more on IG and Twitter.

But the bottom line is that the better you can know your audience and understand the platform they use, the better chance you have for a successful campaign.

Where to begin?

Start by listening. Go to your Twitter, Instagram, and Facebook pages and see what your audience is interested in. See what they are talking about. Learn their concerns and what they like. Is it the same on all platforms?

Any successful campaign starts with listening. And the best way to understand how to best use each platform is to listen to your audience who is already there. Talk to them, Comment on their posts, interact. Get to know your audience. You may even find that your audience or target audience isn't where you thought they would be! Drill down to all platforms.

You will find they are different on each platform and then you have started the journey to successful social media.

We will dive into each platform over this series and tips and tools for each as well as general social media best practices. If you have specific questions please use the contact form to ask. We will get it covered for you. And share below in comments what platforms you use, what your favorite Social Media Platform is and why. Would love to get to know what you are all using.

Ā 

Ā 

Ā 

Ā 

Welcome to Stitch & Hustle - Is Your Hustle On Point?

Hustle is a word I hear a lot. Everyone is hustling. When I was growing up and lived in NYC if you "got hustled" it wasn't always a good thing. Nowadays, everyone is "on their hustle". Some even have a "side hustle'. So let's talk about it. Let's talk about the Hustle.

I recently listened to a podcast with an interview of Matt Mazzeo from Lower Case Capital. Well, the timing of this interview and this message could not have been more perfect. While there were many (many) takeaways from the 20 minute interview, the one I want to talk about right now is being of service and having Hustle. It seems, after all, appropriate right?

Mazzeo was asked how he defines the word "Hustle". Someone as successful as him, you may have expected an answer that talks of non-stop work and being busy busy busy. Or perhaps an answer that talks about constant forward movement. Nope. Here it is:

"Hustle is repeatedly understanding how to offer value to others in advance of asking for value for yourself. [...] It's really truly believing that if I just add value to other people that there doesn't need to be a cash in moment - that you're just doing it because it's the right thing to do because you love doing it and because you can help somebody else. That's a whole other level of hustle."
- Matt Mazzeo, Lower Case Capital

Marinate on that a minute.

Kind of a head turner right? Yet, it makes total sense.

It's natural for me. My hustle has always been behind the scenes. In both my career and personal life, I am happiest when I am able to be of service and support to others. Not because I am people pleasing, which can easily be confused here. But because I like to be part of something so much bigger than myself it requires many elements to be completed. That is kind of magical.

The truth is, coming out from behind the scenes, where I lived in my production life, to be the face and owner of a business was a big transition. Still is in fact. It is a constant struggle against my nature. I prefer being behind the camera rather than in front of it. It is part of why I struggled so much with my previous blog. It always felt too focused on "me" and I was not comfortable with that. Letting it go stagnant was a relief.

But I missed having the opportunity and platform to share my work and creations. A place to share my tips and things I have learned.

So for me, Stitch & Hustle is a bit of a compromise. It allows me to still share my projects but, more importantly, it makes giving back and serving the community of artisans I love so much the priority. I was working on this new blog launch when I listened to the Mazzeo interview. It struck such a cord with me and the timing could not be ignored  (especially since I'm not a real big podcast listener)!

We are meant to be in service of each other. Without community we have nothing. I believe this as a human being and as a member of society.  So why shouldn't our Hustle be part of that?

My hope is that this blog becomes more about you the reader than about me, your host. I hope that I can offer you, through sharing my experiences and thoughts, a resource to grow to be the best version of yourself possible. I hope that by inviting guests to share their knowledge that I can offer you insight and help to become uber successful. I hope that this becomes a place that serves you.

On my hustle!Never gonna stop! 

On my hustle!
Never gonna stop! 

With that bit of background I say welcome to Stitch & Hustle. Let's hustle together! If there is a topic you would like covered, please contact me here and let me know. I will do my best to cover it or invite a knowledgeable guest poster to help us out.

I have brought over some posts from my previous blog that I think may be relevant or of interest as well as have several scheduled topics and posts coming up.

I hope that I can share my hustle; and I'm talking about Hustle in the meaning presented above by Mr. Mazzeo. A hustle not just for my goals or success but to be part of yours!

Sign up for updates and never miss a post! Let's do this! 

Ā