Seriously, We Love Cotton Free Crochet Patterns Round Up

Seriously, We Love Cotton Free Crochet Patterns Round Up

Oh we do love cotton! Cotton is such a wonderful material to work with. It’s super versatile and can be used in most types of crafts, including crochet! In this Seriously, We Love Cotton Free Crochet Pattern Round Up, you’ll find some fantastic cotton designs.

Read More

Crochet On The Go Too! More Projects To Make While On the Go!

Crochet On The Go Too! More Projects To Make While On the Go!

wanted to continue the series of great projects to take with you and bring you Crochet On The Go Too! More Projects To Make While On the Go! These are great projects for you to toss in your bag, or use your On The Go Project Bag and take them EVERYWHERE!

Each of these also makes wonderful gifts and we all know that gift season is just around the corner. You can get started on your handmade gifting with these great Crochet On The Go Too! More Projects To Make While On the Go!

Read More

How To Create Custom Crochet Picot Edges For Your Crochet Shawl

How To Create Custom Crochet Picot Edges For Your Crochet Shawl

One of my favorite things about picot edges is that it can truly add that special finishing touch to any project. Using these tips on How To Create Custom Crochet Picot Edges For Your Crochet Shawl you will be able to make your shawl projects shine with custom finishing.

Read More

Going Big And Chunky With Biggo Yarn From Knit Picks

Going Big And Chunky With Biggo Yarn From Knit Picks

I recently had the opportunity to do a design for We Crochet and selected their Biggo yarn to create the Bridgeport Chunky Cowl. This textured chunky free crochet pattern shows off all that is great about this chunky yarn. I completely fell in love with this yarn and know you will too. It has great stitch definition and being machine washable is a total bonus.

Read More

The Montgomery Street Crochet Shawl Free Pattern - Make It Your Way And Your Size!

The Montgomery Street Crochet Shawl Free Pattern - Make It Your Way And Your Size!

My favorite thing about the The Montgomery Street Crochet Shawl Free Pattern is that you really can make it your own and your size without having to change or alter the pattern in any way! Make it bandana size or oversized or any size you want! I used this Lola Bean Yarn to make a supersized shawl.

Read More

The Story Of The Montgomery Shawl Free Pattern

The Story Of The Montgomery Shawl Free Pattern

The Montgomery Street Bandana Shawl embodies all of the challenges of designing and in such a glorious way that I am excited to bring you this fabulous free pattern, courtesy of my dear friend Kristy Glass. This is the story of how it all came to be!

Read More

A Shawl Of A New Shape

A Shawl Of A New Shape

Since going home to NYC for Vogue Knitting Live in January and then again in April to visit friends and celebrate my birthday, well, I have had my inspiration by architecture reignited. It got me thinking about my crochet design work and it inspired me to present a collection of Shawls Of A New Shape for 2018.

Read More

Get Ready For Summer With The Summer Vest Kit!

I am so excited about this next Kit Shop exclusive collaboration that I can hardly find words. This is really a tale of two Stephanie's and a creative dream.

You know how sometimes you meet people and it is instant connection, inspiration and creativity abound? Well i have been fortunate enough to have that happen a few times and it is such magic. Then when you get to bring some of those relationships together for a collaboration - well then it is purely spectacular! This is one of those magical moments.

vest edit IMG_9075.jpg

Stephanie of Triple Knot Studio has been my crafty friend for a few years now. We met on Instagram and a long lasting friendship quickly formed. It is funny how that can happen and I love it. We have had the chance to hang out many times when she came to Stitch Up Chicago and it is so much fun when we get together. So when she had an idea to design a Summer Vest lightweight cover up I was so excited and all about it!

Bring in yarn dyer extraordinaire and Stephanie number TOO....

So when Stephanie and I were thinking about what yarn would make for a fun Summer Vest I immediately thought of another Stephanie, the brilliant Stephanie behind Asylum Fibers. I met Stephanie when I went to Vogue Knit Live in NYC and it was an INSTANT connection. I was in love with her wit, her humor and her creativity. She came to my big birthday celebration in NYC last month and I KNEW I wanted to collaborate with her. I HAD TO MAKE IT HAPPEN! And we DID!

Stephanie creates Asylum Fiber colorways that make me want to make all the things. So I knew it was perfect for the Summer Vest collaboration and the tale of two Stephanies in an email thread was born.

Summer Vest Crochet Kit-6.jpg

Once we got going it all came together so fast and I loved working with Stephanie of Triple Knot Studio on her first garment design. Bringing her idea to life was challenging and fun and all the things you want it to be when taking on a project like this. On a personal note, it was one of the most rewarding projects I have ever been part of.

There were late nights. Long emails. Tears. So. Many. Tears. Working with Stephanie, such a good friend, on her first garment design really was an experience I will cherish forever.  It is what this blog is about - feeding into the creativity of others. And to have the chance to help feed into the creativity of someone I care so deeply about was a gift in and of itself. OK... back to this AMAZING VEST.....

The Summer Vest is the perfect accessory to your summer wardrobe. It is ideal for over a swimsuit or to dress up a tank top for a night out. This one item will be all you need to pack for vacation to hit all the notes. It works up super fast and has a great pattern stitch for beginners.

In the Limited Edition Kit you get all you need to make this vest: The pattern, stitch-work chart, custom hand dyed fiber from Asylum Fibers, hook and a special handmade project bag. Or you can get the pattern and make one in the color of your choice from Asylum Fibers

We are so excited to feature this collaboration in the Stitch & Hustle Kit Shop!!! Can't wait to see all your summer vests!

summer-vest-crochet-pattern.jpeg

A Crochet Sweater Pattern Worthy of the Drama of Mary Shelley!

The best thing about launching the Stitch & Hustle Kit Shop is that I get to work with and be inspired by so many makers and designers every day. It is the awesome circle of creative energy that feeds and drives more creativity. It's the good stuff.

Mary_Shelley_Crochet_Sweater_Pattern7.jpeg

One gal who constantly inspires me and who has just dropped the latest Stitch & Hustle Exclusive design is Katie of The Queen Stitch. Oh yes, we have featured her many times because she is in fact... um... AWESOMENESS. I knew I wanted to add a sweater to our collective and Katie came up with a masterpiece. The Mary Shelley Sweater.

Read on and she will tell you all about it and you can get the exclusive pattern here.


The inspiration for the Mary Shelley sweater came from the streets of New York City, literally. The silhouette of this sweater came from a piece of graffiti in the LES by Bradley Theodore called "Pineapple Heads".

PineApple Heads by Bradley Theodore

 It seemed out there, dramatic, playful and fun - all things The Queen Stitch brand is built on, and pursues! I am always inspired by textures and shapes around me, and I love a challenge. I wanted to see if I could turn this piece of street art into wearable art (you can be the judge of that).

The sweater couldn't have happened without the support of Stitch & Hustle and them providing me with the awesome Wool and the Gang Feeling Good Yarn.

WATGpicl4.jpeg

The design features a high Victorian neckline, and is created using primarily shell stitch - hence the name "Mary Shelley" (though lit snobs will tell me she was technically of the Gothic era - I hope you'll all give me creative license to utilize the shell pun!)

mc8.jpg

This sweater design challenges conventions with it's vertical stitching to create reach-out-and-touch-it texture. I hope you love it!

Kit Shop Featured Maker: The Queen Stitch

knit 3.png

Although my business name is The Queen Stitch, my real name is Katie - and I’m the featured Kit Shop maker for the month of November! I am primarily a crocheter, though I’ve recently learned to knit, embroider, and weave. Crochet is my first love, and we’re in an open relationship. So, while I play with other crafts for a little while to clear my creative headspace, I always go back to crochet. Colorful, fun, inclusive, flirtatious, I see no reason why knitwear can’t be all of these things at once, and so I wanted to prove it – thus the Queen Stitch was born. My designs are usually a bit different in terms of structure, texture and color. Some of my favorite designs are a flamingo halter top, a lemon wedge bralette, and a backless sweater.

I first connected with Michele of Stitch+Hustle after she reached out to me about my women’s march protest vest, which read “I am more than my pussy, but she great” and I was honored to contribute to her blog! This will be my second contribution and I am so proud of her, the community inclusion in the kit shop, and all the fun projects that will come out of it.

My pieces are inspired by a lot of pop art and cartoons. Sometimes I’ll see a pin or a print on Instagram and think to myself – I could crochet that. That’s how the lemon wedge bralette came into being. I follow a marketing artist called @lizzie_darden, and she made lemon slices and sticks of sage look like a bikini, and I was like… doin’ it! I follow a lot of artists on Instagram – I think it’s about 50/50 of fiber arts to other types, and it’s usually these others that inspire my best knitwear!


 Though, I remember I saw a hot pink crochet kink outfit by @hanaquist that changed my life. Every new strange onesie photo in the wilderness by @lordvonschmitt - I really wish I could go camping with him and all his gorgeous models! I just bought this bare breast knit top from @responsivetextiles that made me the belle of the house party the other weekend. I could go on… I am just so continuously in awe of all the makers in the community.


I sometimes get inspired just by texture as well. @miskunn has this magical bobble pillow that I looked at and thought, I wish I could wear that. Which is how the bobble sweater sprang into being. I think that might be my favorite thing about creating. Seeing something in my head, grabbing a yarn and a hook and slowly watching it appear it front of me. It’s like the design flows right down my arms, going from behind my eyes to in front of my eyes. Plus then I get to wear it.

Alternatively, my least favorite parts of the craft are all practical things, rather than the conceptual and artistic. I live in New York City, my apt is approximately 500 sq feet, and I have another person sharing that space! I see this pictures of people’s gorgeous organized spaces and I’m like… how the frick do they do that? And living in NY isn’t even an excuse. I look at @debrosse_nyc and her space is Type A perfection. Meanwhile I’m sitting on my couch, under approximately 50 skeins of yarn wondering if I have a problem.

knit2.png

I’m not a total loss yet; I usually sort my many works in progress into different project bags. I have the attention span of a beta fish so I like to switch between projects. That way, I’m technically still switching it up, but I’m always working. I always find it interesting when people give tips on making because it seems like the creative process is so different for each person. I’m very much of the “do you” school of thought.

My creative goal this winter is to remind everyone that knitwear doesn’t make you anything other than cozy. I catch some flack from my friends for going to bed early and making knitwear. Knitwear doesn’t make you frumpy, it doesn’t make you grandma-like, it doesn’t make you anything.  You can be hot, smart, active and ambitious and wear knits, you can go to bed whenever you want and wear knits. I have a couple fun projects lined up towards this goal in terms of re-branding, photoshoots, new patterns – so stay tuned for some more fun!


Make Sure to connect with The Queen Stitch:
Website: http://thequeenstitch.com/
Etsy Shop: https://www.etsy.com/shop/TheQueenStitch
Facebook: https://www.facebook.com/TheQueenStitch/
Instagram: @thequeenstitch

Write That Pattern! How To Write A Crochet Pattern

I was recently asked by Vincent of Knot Bad to help him learn to write patterns for his wearable items. That request for help was followed by a long series of texts over the next several days with lessons covering everything from how to determine gauge and yarn requirements to general verbiage and then... like magic he published his first wearable pattern. YAY! Success!

I was also helping two other friends begin writing patterns this week and since I know so many ask about writing patterns and bringing ideas to life, I thought why not share my process with everyone and make it a blog post. Now I am sitting here typing and thinking, I wish I had saved my texts with Vincent so I could paste them here for ease. LOL. No worries... we can dive in. Let me start by saying: YOU CAN DO THIS.

To begin, I always go back to something Drew Emborsky (AKA The Crochet Dude) told me when I was first starting to write my own patterns and overwhelmed and clueless: Start simple. Make it a tutorial and just tell people what to do. It is so simple it is almost mind blowing. Write down what you do. Revolutionary right? But that's all a pattern really is: instructions to tell someone else how to achieve the same result you did. A roadmap.

My first patterns were more like tutorials and not at all technical. But they got the job done: to tell people how to make what I made. As my designs grew in difficulty, my pattern writing skills were becoming more developed as well. So while tutorials saying do this, then do this are great and can often do the trick, for garments with sizing and items with design variations I would need to go beyond that with solid pattern writing.

It all starts with an idea and some yarn...

For me, my process always starts with an idea. I have in my mind a look to achieve. As I work to achieve that look I take detailed notes. I have learned over the years that I should use pencil. There is a lot of erasing in my process. I also have a single design book that is in my studio but also carry mini design books in my bag for ideas that hit on the go. I prefer the grid pages of Doane Paper for my travel books and have a journal notebook for my main designs.

My note process is twofold: I write down what I do in words, but I also draw the stitchwork. This is known as Charting. I know it is intimidating to many, but the truth is that charting is a HUGE time saver. I can literally see the chart in my mind when I imagine what I want to create. I can visualize the stitches and it helps me create the exact look I am going for. It is also great for when I am in the groove and don't want to write all the words. I can just chart and come back later to fill in the complete steps.

Once I have got my notes and finished garment it is time to write up that pattern. Woo Hoo! Now starts the real work and is much less fun. Though, I have to admit... I kind of like this part too. As you sit down to turn your notes into your pattern, don't feel like things are "known" or make assumptions. The thing about writing a pattern is information: you want to give as much detail as you can to the person making it. Success is when I never hear from a customer except to show me what they have made. That means I have communicated clearly and they are able to create the item.

I have written enough patterns where now, I have a template that works for me and is set up to always give me prompts to add information. It is super helpful so I don't leave things out. Information your pattern should have at the start:

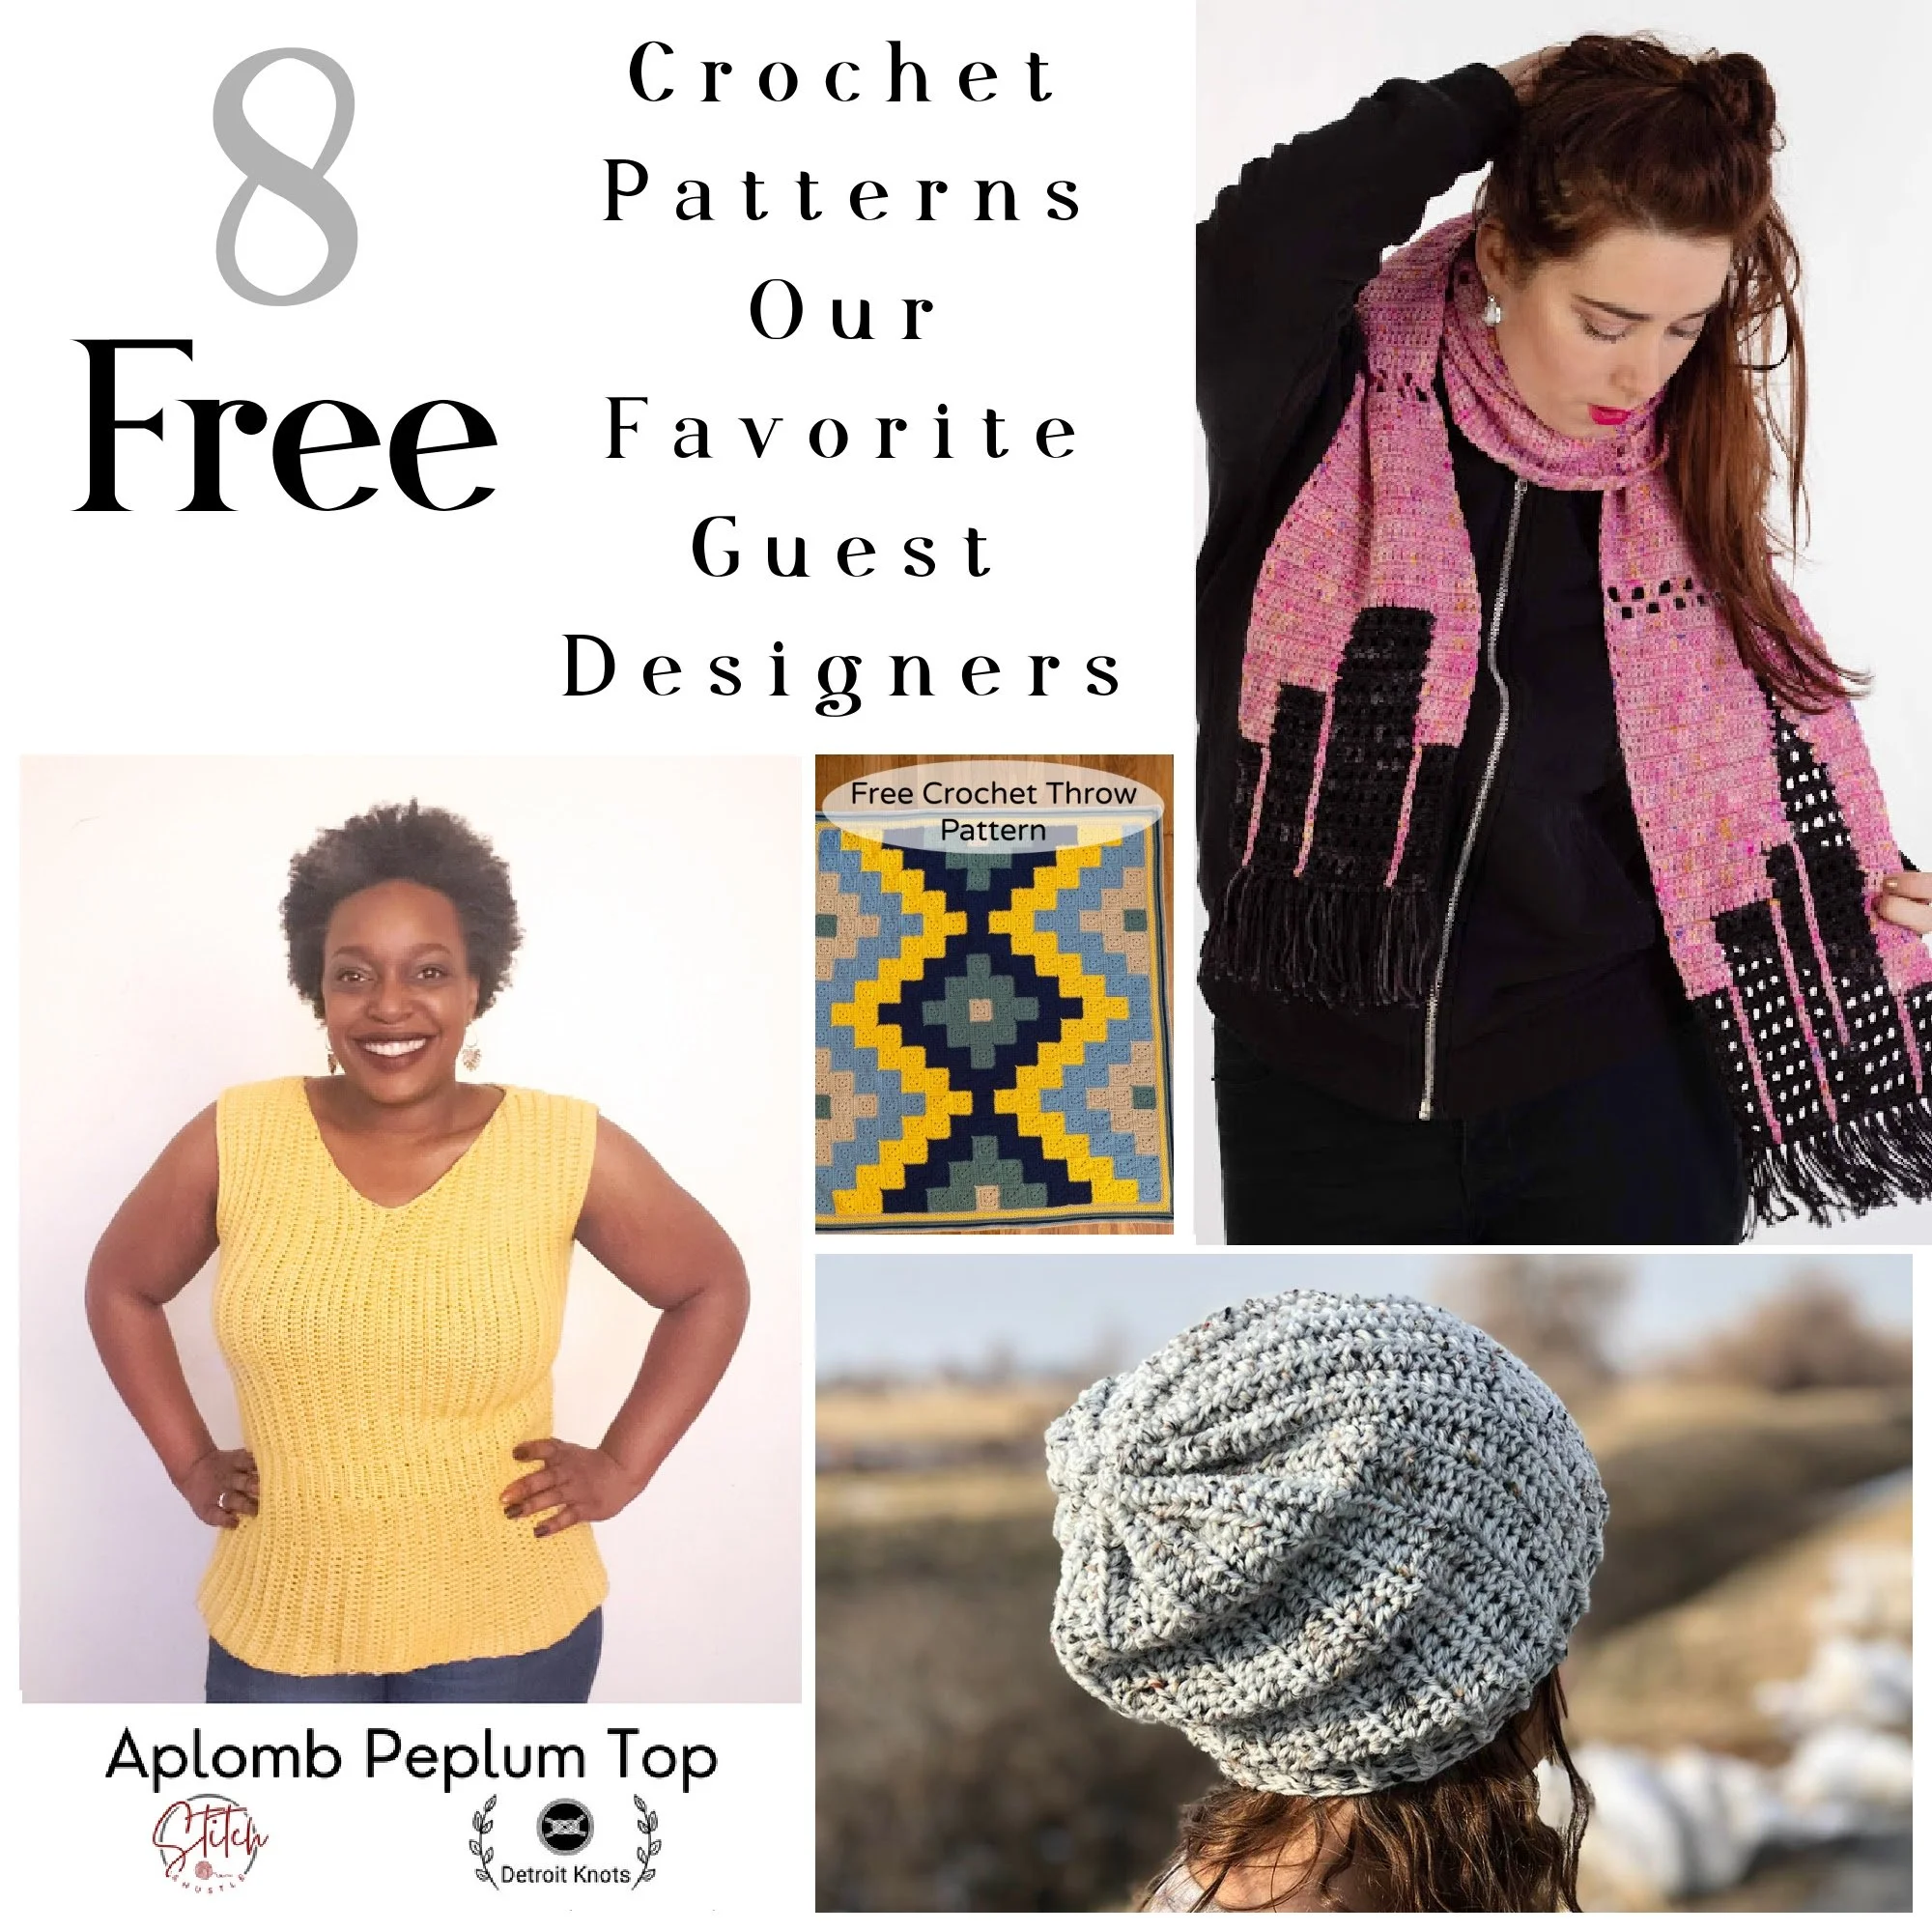
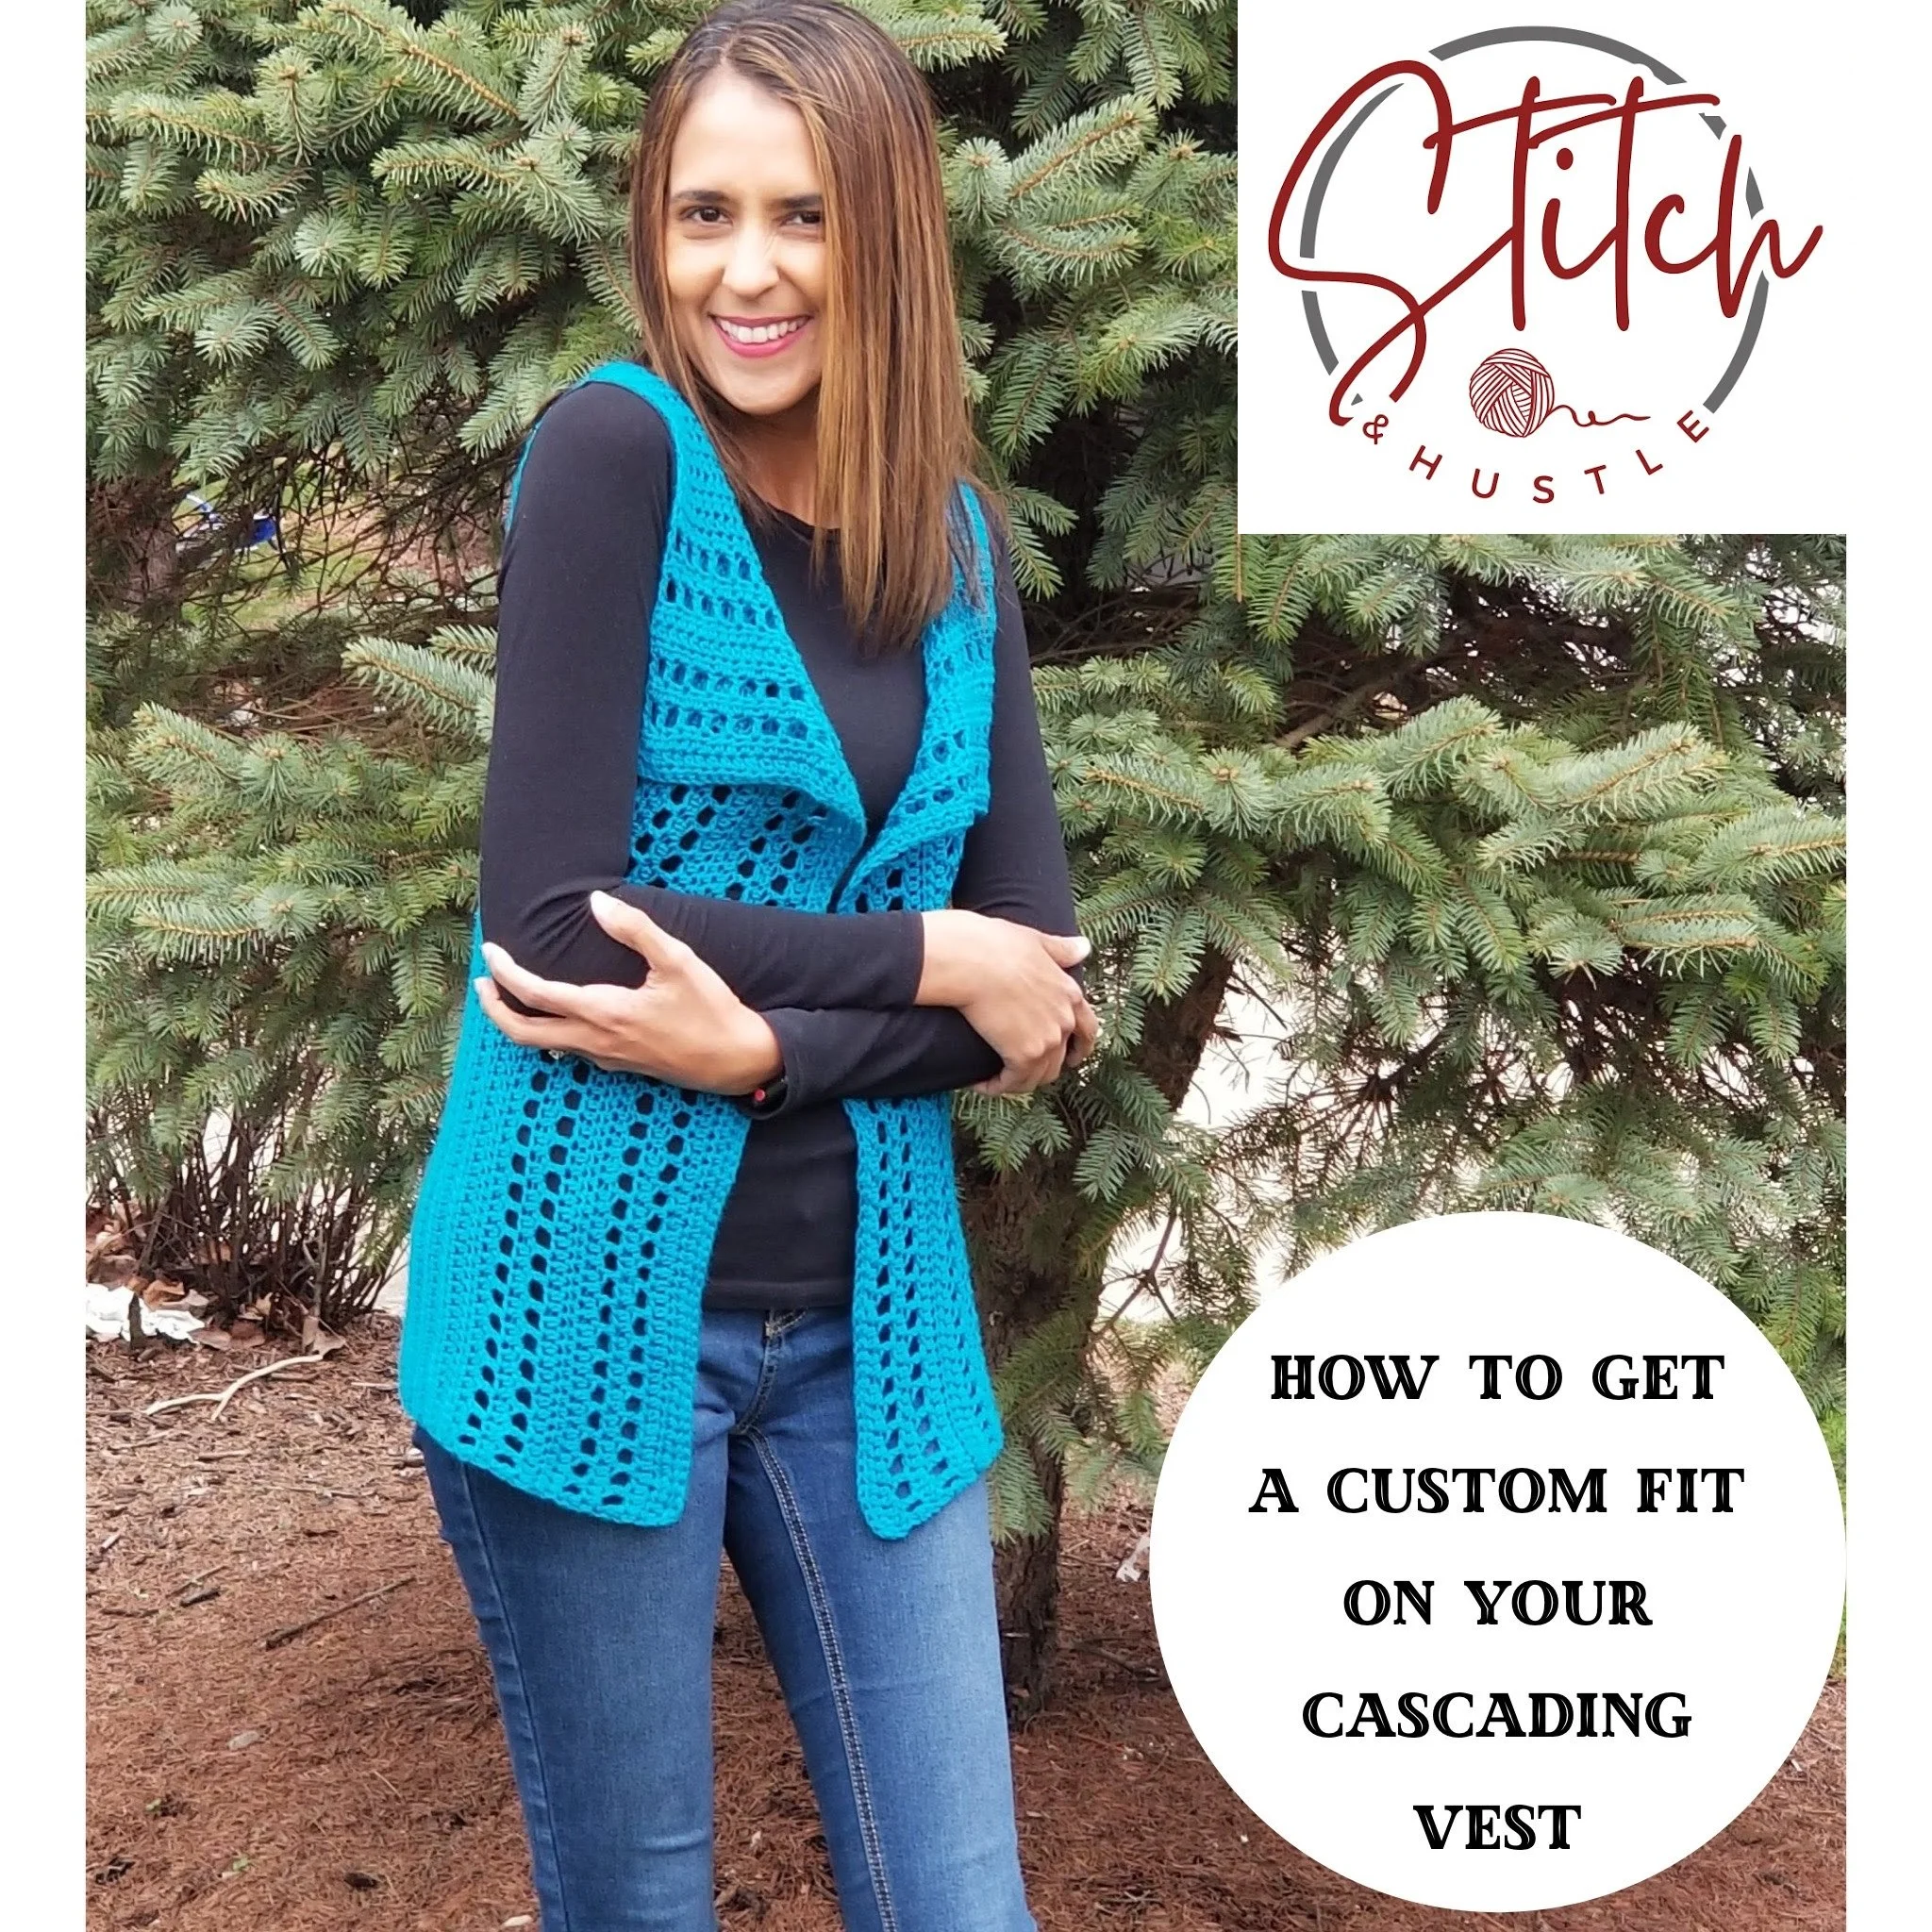
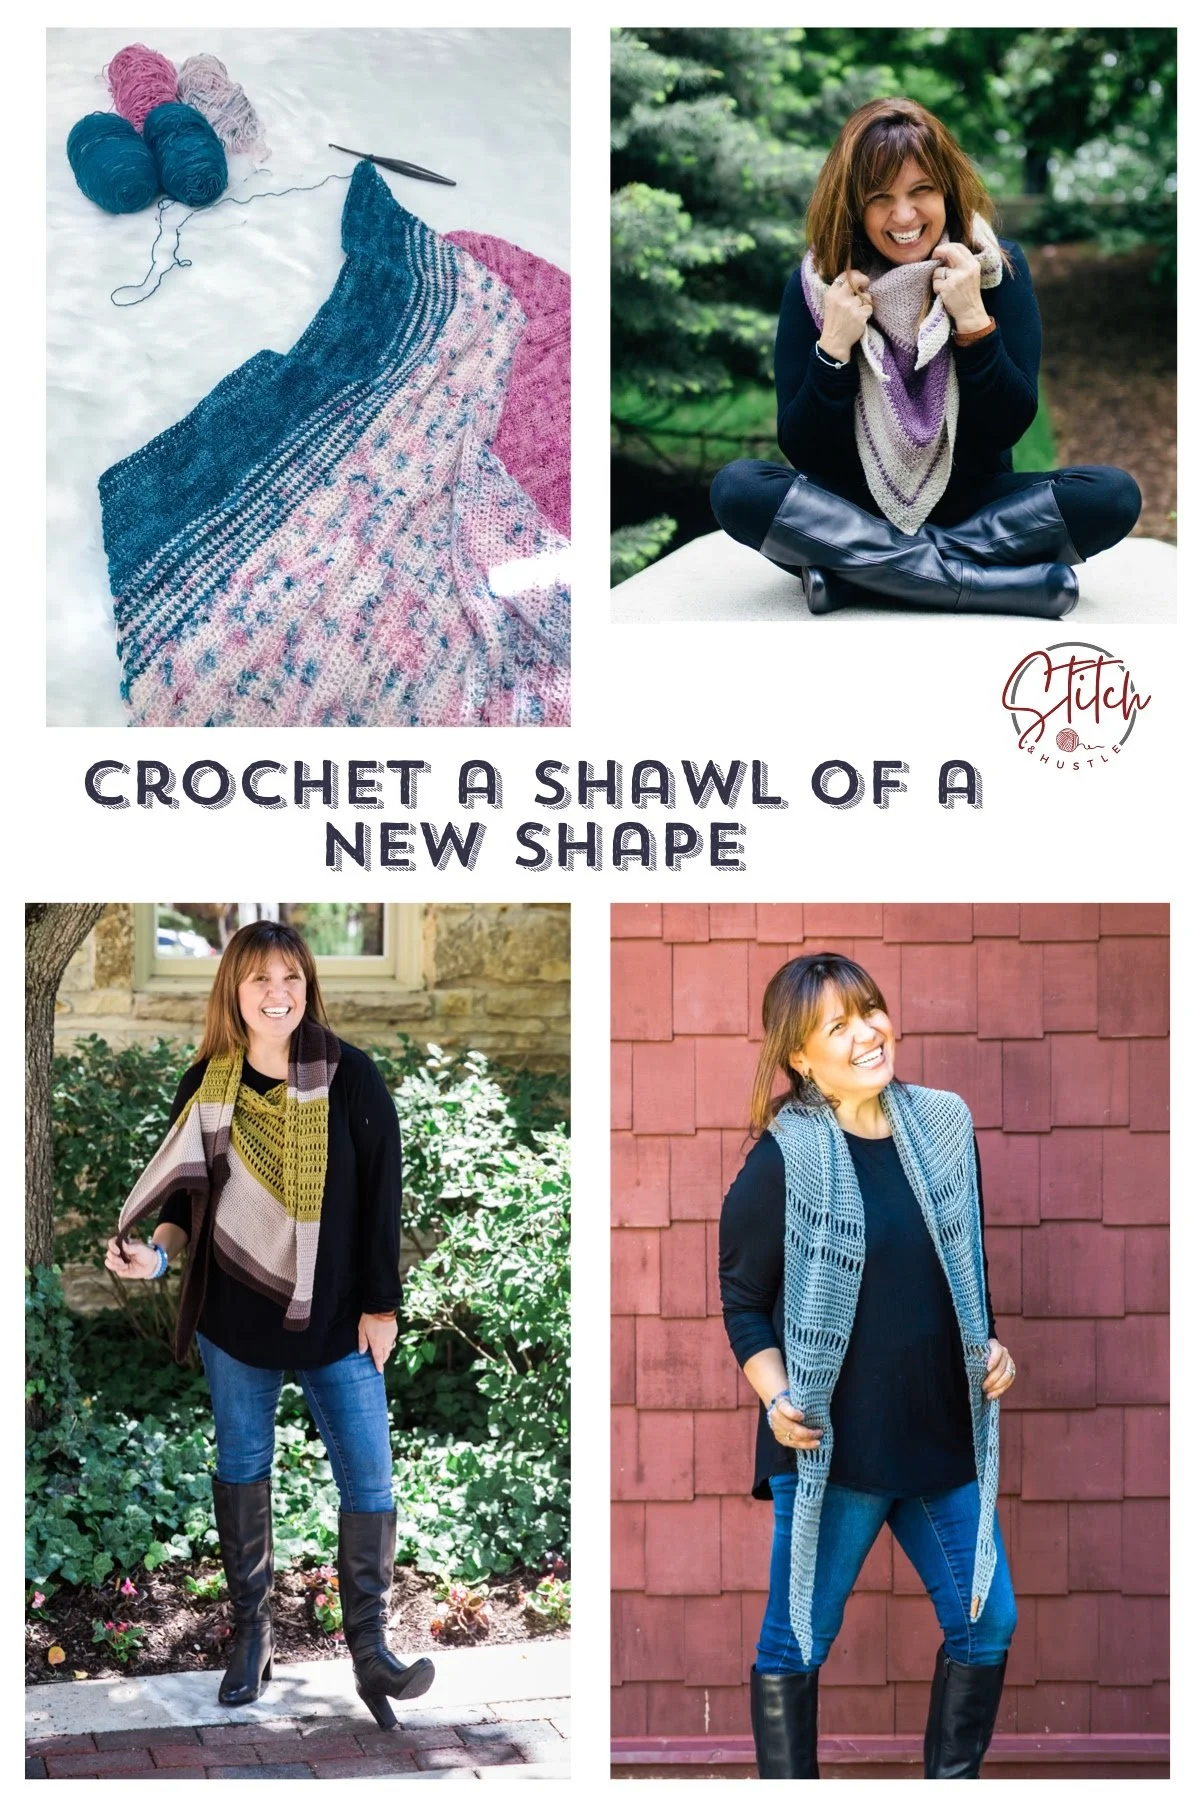
WHAT IS IT: What are people making? Who designed it? My cover page always has my logo, website, copyright detail, pattern name and photos right off the top. Boom!

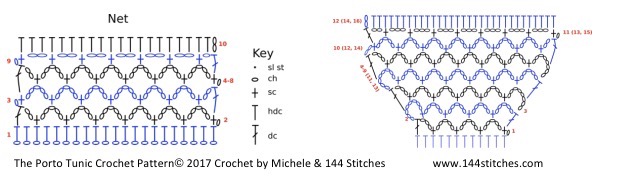
WHAT DO YOU NEED: Remember, you are giving someone all the information to make your design. I always list supplies and stitches off the top. For stitches: I give the abbreviation and the stitch name. People crochet & knit all over the world so be clear. I refer to the Craft Yarn Council for best practices on abbreviations.

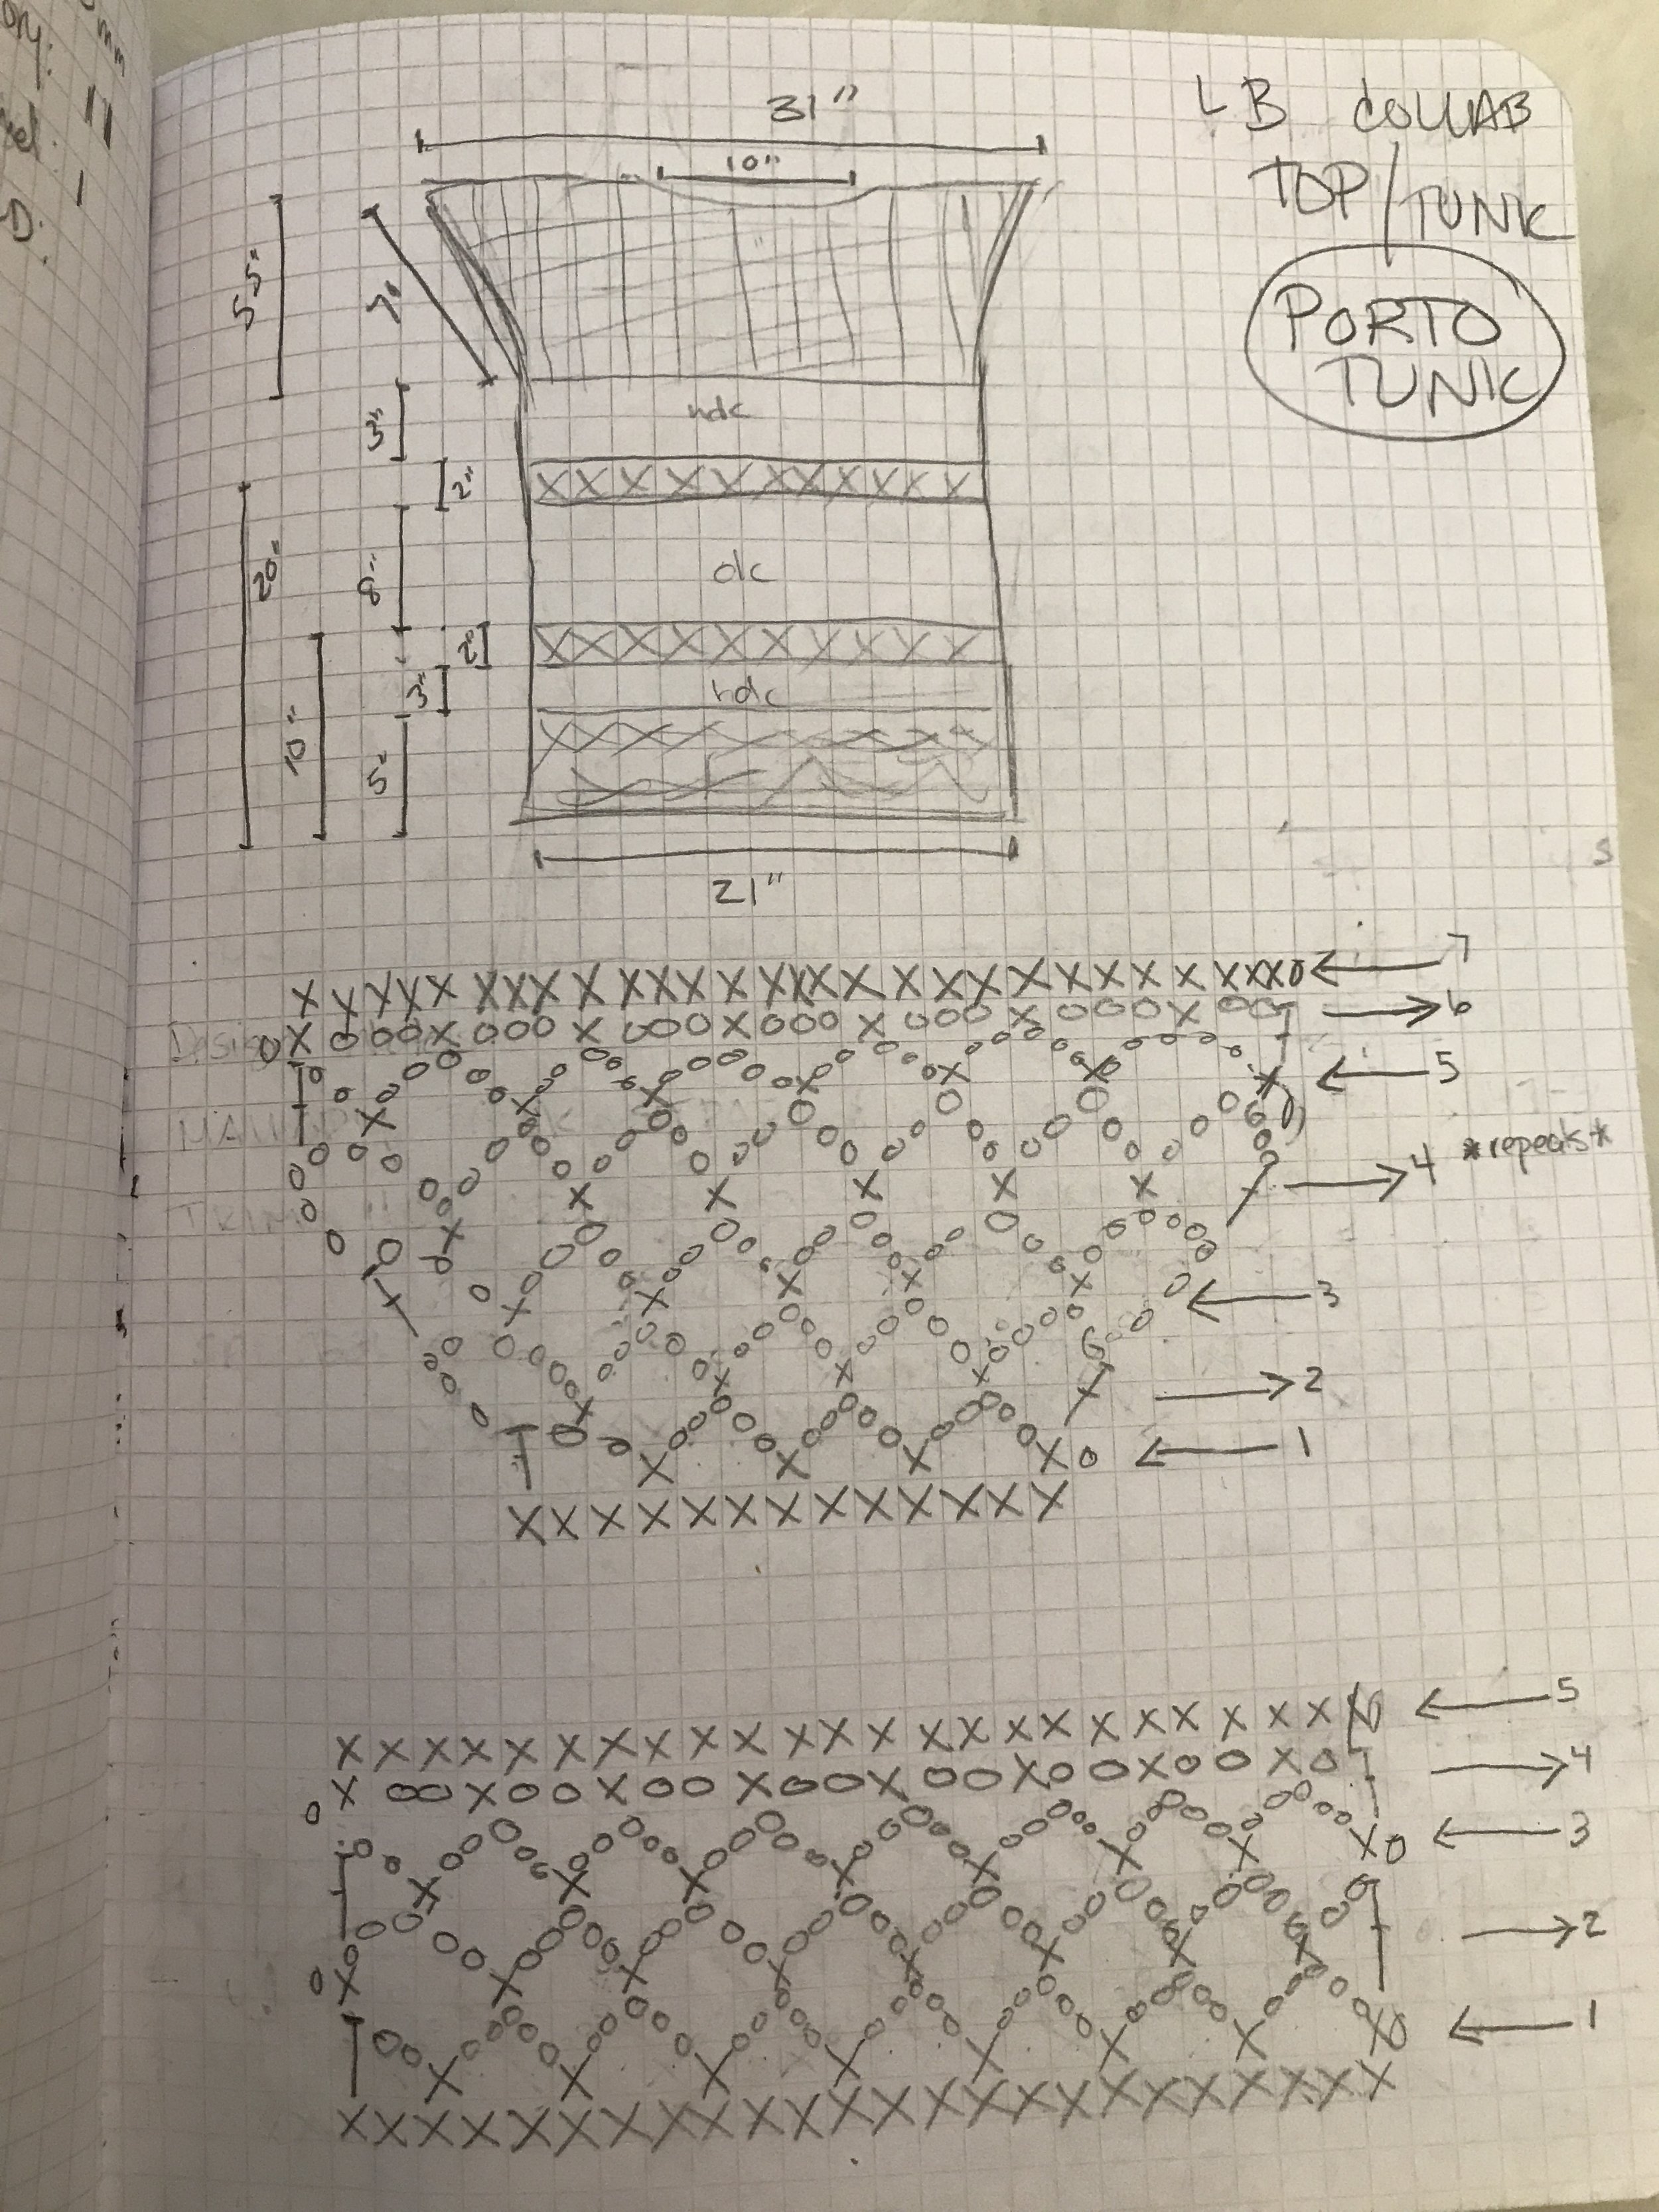
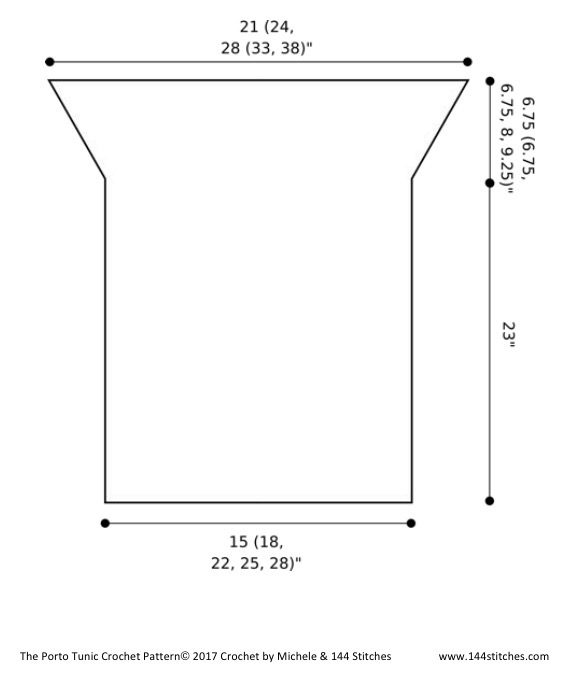
WHAT ELSE DO YOU NEED TO KNOW: Again, the most important thing is to communicate as much information as possible for the user to get the result they want. On my sizes I use standard sizing but also give information on specific areas (bust or waist, etc) as well as any information on how the garment fit is designed. Sizing details will vary based on what the pattern is for. Again, I refer to Craft Yarn Council standards for best practices on sizing

GAUGE: OK... I could (and will) do a whole blog post on gauge. Gauge is my nemesis but it is essential. Gauge is the way to success, especially if you are using multiple stitches. In this case you need to communicate to the user how to achieve gauge and what stitch is used. No one has the exact same tension so in order to achieve the look, the user will need to know gauge.

Phew.... still with me? Now we get into the actual pattern... the meat and potatoes. YUM!

Design / Pattern Writing Essentials: Yarn, Coffee, Notebook, Markers, Tape Measure, Notions.

Take a look at some of the Free Patterns on this blog to get a feel for this part of the process. This is where you actually tell the people what steps to take so they can create the masterpiece you designed.  But this is not the time to feature all of your creative writing skills. Less is more here. No fluff. Just clear and precise directions.

And anyone who has purchased my patterns knows that I try to lay out the steps concisely and clearly as well as include charts and schematics. It is ok if you do not know how to do charts or schematics. You can also include photos if that best illustrates what needs to be done. As long as you are clearly laying that road map out then you are all good.

OK. So you've got your item made, notes transcribed into steps to follow and you've added photos or charts as needed. GO YOU!!!! You have nearly got yourself a pattern. Have a sip of coffee and get ready for the home stretch.

Give the pattern a once over, then a twice over, and maybe even a third look to scan for mistakes & make sure you got all of your notes from your notebook on there. This is the point where I would send my pattern off for technical editing. This is basically the process where the pattern is checked by a pro. The math is checked. The schematics are added (if they haven't been already) or checked. The pattern is checked to follow best practices and standards set by the Craft Yarn Council and such. This is a step I know many do not take because it costs money. For me, as a professional pattern writer it is essential.

So now here you are: You have written, checked and re-checked your pattern. You have had the math checked and tech edited the language. You are almost ready to hit that publish button.

But first -  you need to take it out for a spin. Grab some of your fiber friends and see if anyone is available to test your pattern out. Often times I miss things. It happens. In June I published 24 patterns that month. I would be lying if I said they were all perfect out of the gate!

Having fiber friends test your pattern is an invaluable opportunity for feedback from everything to gauge to fit to stitch counts to grammar to you name it. I am fortunate to have a great pool of testers and would not get my patterns out there without them.

Now you've had an idea, you've brought it to life and created a way for OTHERS TO CREATE. Woo Hoo! Publish your pattern and do a little dance.

Can't wait to see all of your design ideas coming to life. Happy designing.
And see part 2 of this post here